关于SpringMVC框架的细节介绍
一、Controller配置总结
1.1 Controller介绍
- Controller:控制器
- 控制器提供访问应用程序的行为,可以通过实现接口/注解的形式来实现
- 控制器负责解析用户的请求,并转变成一个模型model
1.2 实现方法
- (1)实现接口的方式
- 实现方法和之前一样,但是把配置的处理器 和 适配器删掉也能够正常运行,正常开发是不需要配置这两样东西的,为了将原理才使用
- 缺点:一个实现Controller接口的类,只能实现一个方法,导致需要创建大量的类
- 实现Controller接口方法比较旧,已经不推荐使用了
1 | public class ControllerTest1 implements Controller { |
- (2)以添加@Controller注解方式实现
- 学Spring也讲过其他注解@Component @Service @Repositort,功能都一样,就是为了区分而已
1 | //代表这个类会被Spring进行接管,这个注解的类中所有方法,如果返回值是String,且有具体的页面可以跳转,就可以被视图解析器解析。 |
二、结果跳转方式
2.1 原生的ServletAPI
- 通过设置ServletAPI,不需要视图解析器
- (1)通过HttpServeltResponse进行输出
- (2)通过HttpServletResponse实现重定向
- (3)通过HttpServletResponse实现转发
2.2 通过ModelAndView
- 通过
setViewName("")方法来设置View名称,通过视图解析器跳转到指定页面- 页面:{视图解析器前缀} + viewName + {视图解析器后缀}
2.3 SpringMVC
- 创建String的返回方法
- (1)无需视图解析器
return "/index.jsp"jsp页面的全类名- 转发:
return "forward:/index.jsp" - 重定向:
return "redirect:index.jsp"
- (2)视图解析器
return "具体的jsp名称"- 重定向:
return "redirect:index.jsp"重定向仍然要写全类名
三、ResutFul风格
3.1 介绍
普通风格访问页面:
localhost:8080/mehtod?add=1&...RestFul风格:
localhost:8080/mehtod/add/1/2/...ResutFul是一个资源定位操作风格,软件可以更简洁,更有层次,更易于实现缓存机制
3.2 资源操作方式
- 资源操作:使用POST、DELETE、PUT、GET,使用不同方法对资源进行操作
- 分别对应:添加,删除,修改,查询
- 传统方式操作资源:通过不同的参数来实现不同的效果,每个链接都不相同
http://xxx.xxx.com/item/queryItem.aciton?id=1查询:GEThttp://xxx.xxx.com/item/saveItem.aciton新增:POSThttp://xxx.xxx.com/item/updateItem.aciton更新:POSThttp://xxx.xxx.com/item/deleteItem.aciton?id=1删除:GET/POST
- resutFul操作资源:通过不同的请求方式来实现不同效果(链接接一样,功能不同)
http://xxx.xxx.com/item/1查询:GEThttp://xxx.xxx.com/item新增:POSThttp://xxx.xxx.com/item更新:PUThttp://xxx.xxx.com/item/1删除:DELETE
3.3 实现方法
- (1)基本实现:使用@PathVariable,让参数的值绑定到URM模板上
1 | /* |
- (2)实现同一链接,不同功能
- 设置参数method,传入参数为RequestMethod对象,是个枚举类
1 | /* |
- (3)通过注解实现同一链接,不同方法
- 通过一下注解来取代
@RequestMappng()
- 通过一下注解来取代
1 | /* |
四、数据处理
4.1 处理提交数据
- (1)正常方法
?参数名=参数值
1 | // http://localhost:8080/user/t1?name=莱特雷 |
- (2)起别名
- 用
@RequestParam("")起个别名,再用上面方法传参
- 用
1 | // http://localhost:8080/user/t2?username=莱特雷 |
- (3)前端接受是一个对象时
- 把创建对象所需要的值进行传递,
?参数=值&?参数=值?参数=值...
- 把创建对象所需要的值进行传递,
1 | public class User { |
1 | //前端接受的是一个对象:id, name, age |
4.2 将后台的数据显示到前端
- (1)ModelAndView
- 通过
public ModelAndView addObject(String attributeName, @Nullable Object attributeValue)来封装数据给前端
- 通过
- (2)Model
- 通过
Model addAttribute(String var1, @Nullable Object var2)来封装数据给前端
- 通过
- (3)ModelMap
- ModelMap:继承与LinkHashMap,所以他拥有LinkedHashMap的全部功能
- (4)对比
- Model: 只有几个方法只适合用于存储数据,简化了新手对于Model对象的操作和理解(推荐使用)
- ModelMap:继承了LinkMap,处理时限了自身的一些方法,同样继承LinkMap的方法和特性
- ModelAndView:可以穿出数据的同时,可以进行设置返回的逻辑视图,进行跳转
五、解决乱码问题
5.1 乱码出现
- (1)控制器创建一个请求方式为POST的方法
1 |
|
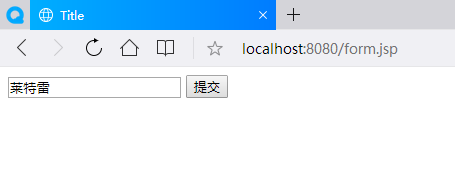
- (2)创建一个表单jsp,跳转到该控制器,使用post方法
1 | <%@ page contentType="text/html;charset=UTF-8" language="java" %> |
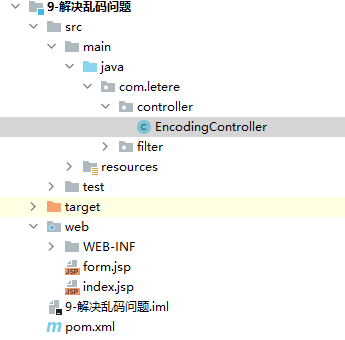
- (3)目录结构如下
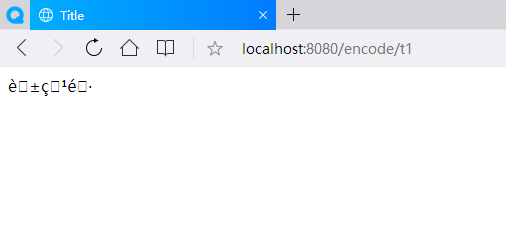
- (4)网页输入:http://localhost:8080/form.jsp ,填写数据再提交,出现乱码
5.2 乱码解决
- 由于post方法提交数据,会导致数据变成乱码,解决方法可以将post方法换成get
- 如果仍然用post方法提交,则需要使用到过滤器了
- (1)使用自定义过滤器
- 类实现Filter接口,重写doFilter方法
- 在web.xml中注册自定义过滤器
1 | 过滤器 |
1 | web.xml文件 |
- (2)使用SpringMVC自带的过滤器
- 直接在web.xml注册自带的过滤器
CharacterEncodingFilter
- 直接在web.xml注册自带的过滤器
1 | web.xml文件 |