简单用个实例来加深SpringBoot的使用
一、基础准备
1.1 创建JavaBean
1
2
3
4
| <dependency>
<groupId>org.projectlombok</groupId>
<artifactId>lombok</artifactId>
</dependency>
|
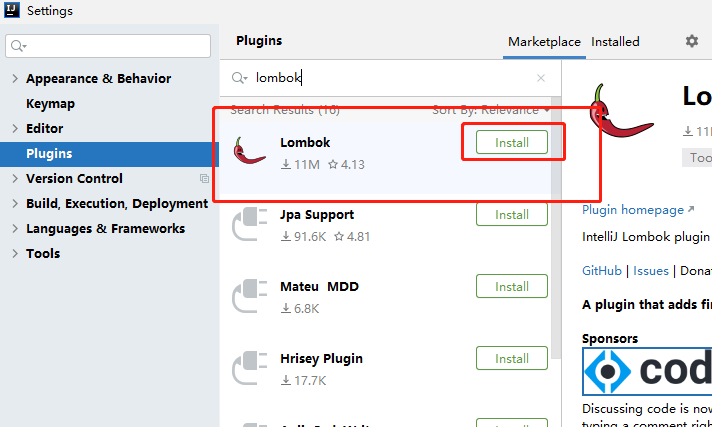
在SpringBoot中导入lombok依赖不能使用,还要进行插件安装
“Settings” –> “Plugins” –> 搜索”lomnok” –> 安装
1
2
3
4
5
6
| @Data
@AllArgsConstructor
@NoArgsConstructor
public class Department {
private Integer id;
private String departmentName;
|
1
2
3
4
5
6
7
8
9
10
11
| @Data
@AllArgsConstructor
@NoArgsConstructor
public class Employee {
private Integer id;
private String lastName;
private String email;
private Integer gender;
private Department department;
private Date date;
}
|
1.2 创建对应的DAO类
为了方便,就暂时不整合Mybatis,就将数据存放在Java类中,并直接实现其方法
1
2
3
4
5
6
7
8
9
10
11
12
13
14
15
16
17
18
19
20
21
22
23
24
25
| public class DepartmentDao {
private static Map<Integer, Department> departmentMap = null;
static {
departmentMap = new HashMap<>();
departmentMap.put(101, new Department(101, "教学部"));
departmentMap.put(102, new Department(102, "市场部"));
departmentMap.put(103, new Department(103, "教研部"));
departmentMap.put(104, new Department(104, "运营部"));
departmentMap.put(105, new Department(105, "后勤部"));
}
public static Collection<Department> getDepartMents(){
return departmentMap.values();
}
public static Department getDepartmentById(Integer id){
return departmentMap.get(id);
}
}
|
1
2
3
4
5
6
7
8
9
10
11
12
13
14
15
16
17
18
19
20
21
22
23
24
25
26
27
28
29
30
31
32
33
34
35
36
37
38
39
40
41
42
43
44
45
46
| public class EmployeeDao {
private static Map<Integer, Employee> employees;
static{
employees = new HashMap<>();
employees.put(101, new Employee(101, "C酱", "CC.com", 1, DepartmentDao.getDepartmentById(101)));
employees.put(102, new Employee(102, "咕料", "gu.com", 0, DepartmentDao.getDepartmentById(102)));
employees.put(103, new Employee(103, "定春", "sadaharu.com", 0, DepartmentDao.getDepartmentById(103)));
employees.put(104, new Employee(104, "YJJ", "yjj.com", 0, DepartmentDao.getDepartmentById(104)));
employees.put(105, new Employee(105, "盐取", "tukubi.com", 0, DepartmentDao.getDepartmentById(105)));
}
private static Integer initId = 106;
public static void addEmployee(Employee employee, Integer id){
if (employee.getId() == null){
employee.setId(initId++);
}
if (employee.getDepartment() == null){
employee.setDepartment(DepartmentDao.getDepartmentById(id));
}
employees.put(employee.getId(), employee);
}
public static Collection<Employee> getEmployees(){
return employees.values();
}
public static Employee getEmployeeById(Integer id){
return employees.get(id);
}
public static void delete(Integer id){
employees.remove(id);
}
}
|
1.3 拓展WebMvc配置类
1
2
3
4
| @Configuration
public class WebMvcConfig implements WebMvcConfigurer {
}
|
1.4 实例需要的静态资源下载
百度网盘 提取码:vi6a
asserts放在静态资源文件夹
其他html放在templates文件夹下
二、设置主页
虽然将index.html直接放在静态资源文件夹就可以自动设置主页,但真正的开发中一般将网页和静态资源区分,所以会将页面放在templates文件夹中
因此需要导入模板引擎thymeleaf启动器
1
2
3
4
| <dependency>
<groupId>org.springframework.boot</groupId>
<artifactId>spring-boot-starter-thymeleaf</artifactId>
</dependency>
|
2.1 通过Controller跳转
1
2
3
4
5
6
7
8
9
10
| @Controller
public class IndexController {
@RequestMapping({"/", "/index.html"})
public String getIndex(){
return "index";
}
}
|
2.2 通过拓展WebMvc配置类跳转
1
2
3
4
5
6
7
8
9
10
| @Configuration
public class WebMvcConfig implements WebMvcConfigurer {
@Override
public void addViewControllers(ViewControllerRegistry registry){
registry.addViewController("/").setViewName("index");
registry.addViewController("/index.html").setViewName("index");
}
|
2.3 解决CSS样式丢失问题
CSS样式丢失原因为thymeleaf模板引擎取值的方式不同
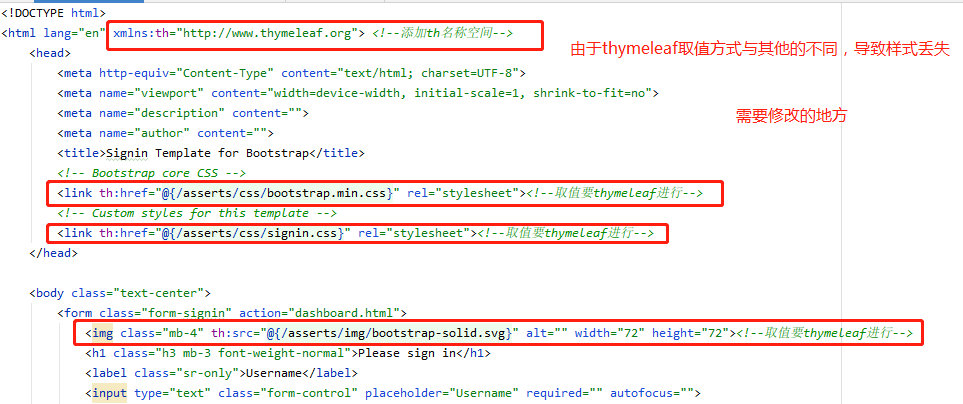
也顺便把其他页面的本地资源位置重新按照thymeleaf方式修改
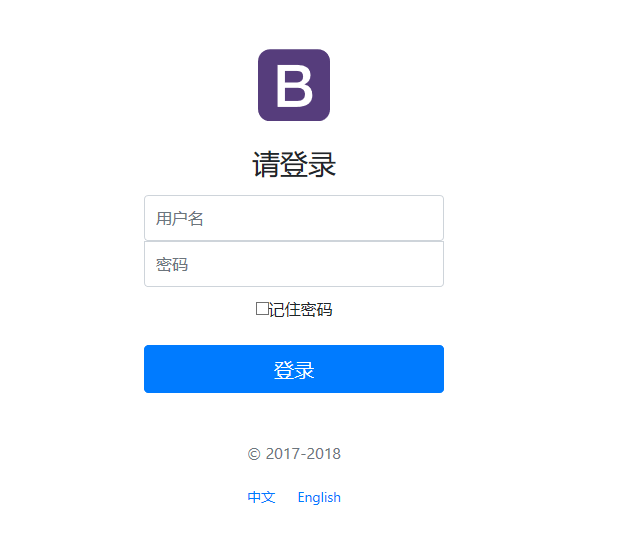
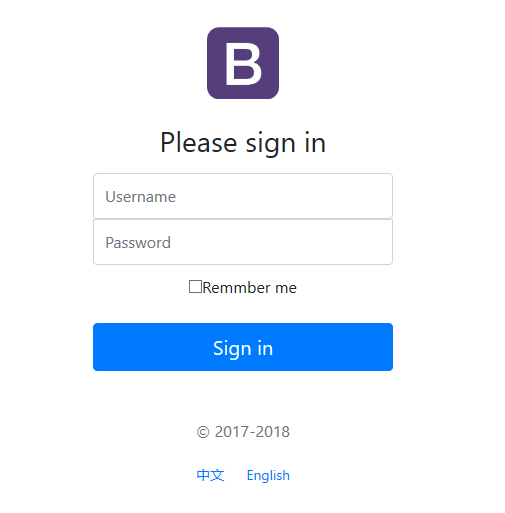
三、国际化设置
所谓国际化,就是支持页面语言的切换
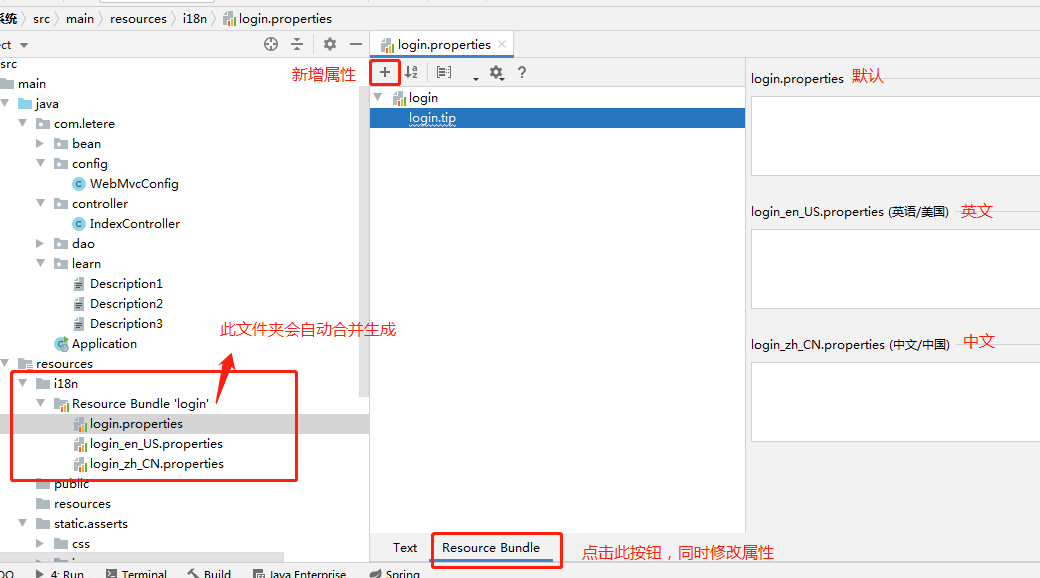
3.1 创建配置文件
- (1)在resources文件夹下创建名为i18n的文件夹(国际化 –> Internationalization –> 首字母i 和 尾字母之间隔了18个字母)
- (2)并在i18n文件夹下创建login.properties(名字随意)【默认语言】,login_zh_CN.properties【中文】,login_en_US.propertirs【英文】,会自动合并为login
- (3)添加网页中需要语言的参数,IDEA中有便捷方式快速添加
3.2 配置信息
1
2
3
4
5
6
7
8
9
10
11
12
13
14
15
16
17
18
19
20
21
22
23
24
25
26
27
28
29
30
31
32
33
34
35
36
| public class MessageSourceAutoConfiguration {
private static final Resource[] NO_RESOURCES = {};
@Bean
@ConfigurationProperties(prefix = "spring.messages")
public MessageSourceProperties messageSourceProperties() {
return new MessageSourceProperties();
}
@Bean
public MessageSource messageSource(MessageSourceProperties properties) {
ResourceBundleMessageSource messageSource = new ResourceBundleMessageSource();
if (StringUtils.hasText(properties.getBasename())) {
messageSource.setBasenames(StringUtils
.commaDelimitedListToStringArray(StringUtils.trimAllWhitespace(properties.getBasename())));
}
if (properties.getEncoding() != null) {
messageSource.setDefaultEncoding(properties.getEncoding().name());
}
messageSource.setFallbackToSystemLocale(properties.isFallbackToSystemLocale());
Duration cacheDuration = properties.getCacheDuration();
if (cacheDuration != null) {
messageSource.setCacheMillis(cacheDuration.toMillis());
}
messageSource.setAlwaysUseMessageFormat(properties.isAlwaysUseMessageFormat());
messageSource.setUseCodeAsDefaultMessage(properties.isUseCodeAsDefaultMessage());
return messageSource;
}
||能配置的内容
public class MessageSourceProperties {
private String basename = "messages";
private Charset encoding = StandardCharsets.UTF_8;
}
|
总结:在配置文件中填写配置信息的位置spring.messages.basename=””
1
2
3
| spring:
messages:
basename: i18n.login
|
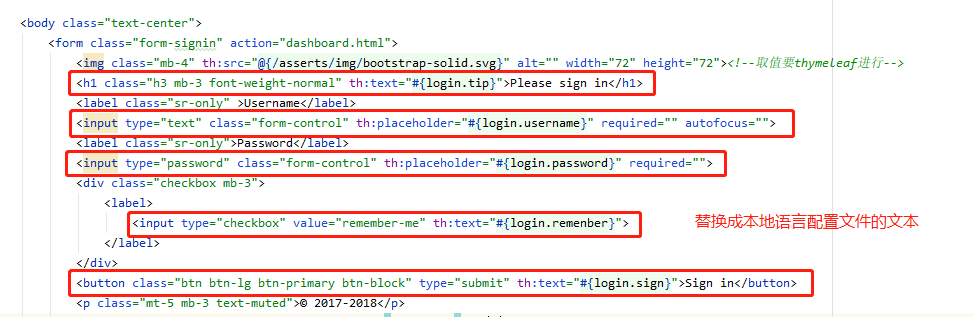
3.3 修改主页提取信息
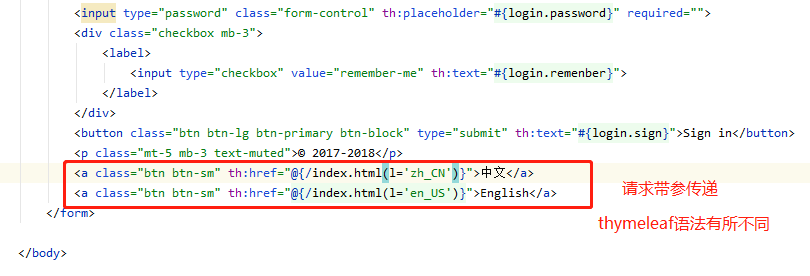
3.4 语言切换设置
1
2
3
4
5
6
7
8
9
10
11
12
13
14
15
16
17
18
19
20
21
22
23
24
25
26
27
28
29
30
31
32
33
| WebMvcAutoConfiguration.java
@Bean
@ConditionalOnMissingBean
@ConditionalOnProperty(prefix = "spring.mvc", name = "locale")
public LocaleResolver localeResolver() {
if (this.mvcProperties.getLocaleResolver() == WebMvcProperties.LocaleResolver.FIXED) {
return new FixedLocaleResolver(this.mvcProperties.getLocale());
}
AcceptHeaderLocaleResolver localeResolver = new AcceptHeaderLocaleResolver();
localeResolver.setDefaultLocale(this.mvcProperties.getLocale());
return localeResolver;
}
||跳转
public class AcceptHeaderLocaleResolver implements LocaleResolver {
@Override
public Locale resolveLocale(HttpServletRequest request) {
Locale defaultLocale = getDefaultLocale();
if (defaultLocale != null && request.getHeader("Accept-Language") == null) {
return defaultLocale;
}
Locale requestLocale = request.getLocale();
List<Locale> supportedLocales = getSupportedLocales();
if (supportedLocales.isEmpty() || supportedLocales.contains(requestLocale)) {
return requestLocale;
}
Locale supportedLocale = findSupportedLocale(request, supportedLocales);
if (supportedLocale != null) {
return supportedLocale;
}
return (defaultLocale != null ? defaultLocale : requestLocale);
}
}
|
总结:新建一个自定义的地区分解器,将次注入的WebMvc配置类中
- (3)自定义localeResolver(地区分解器)
1
2
3
4
5
6
7
8
9
10
11
12
13
14
15
16
17
18
19
20
21
22
23
24
| public class MyLocaleResolver implements LocaleResolver {
@Override
public Locale resolveLocale(HttpServletRequest request) {
String language = request.getParameter("l");
Locale locale = Locale.getDefault();
if (language != null){
String[] split = language.split("_");
locale = new Locale(split[0], split[1]);
}
return locale;
}
@Override
public void setLocale(HttpServletRequest request, HttpServletResponse response, Locale locale) {
}
}
|
- (4)将localeResolver注入WebMvc配置类中
1
2
3
4
5
6
7
8
9
10
11
12
13
14
15
16
17
| @Configuration
public class WebMvcConfig implements WebMvcConfigurer {
@Override
public void addViewControllers(ViewControllerRegistry registry){
registry.addViewController("/").setViewName("index");
registry.addViewController("/index.html").setViewName("index");
}
@Bean
public LocaleResolver localeResolver(){
return new MyLocaleResolver();
}
}
|
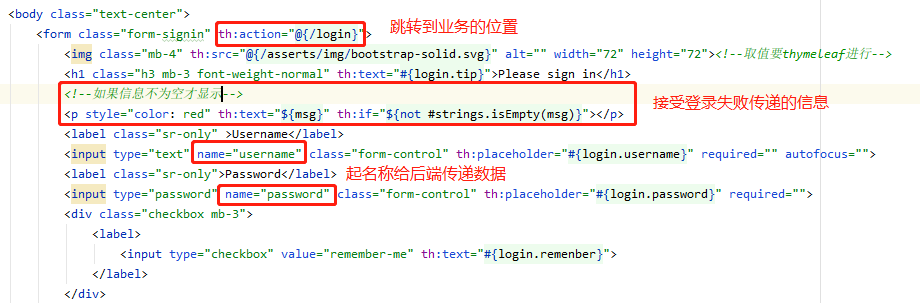
四、编写登录后的页面
4.1 编写主页
4.2 编写Controller跳转
1
2
3
4
5
6
7
8
9
10
11
12
13
| @Controller
public class LoginController {
@RequestMapping("/login")
public String login(@RequestParam("username") String username, @RequestParam("password") String password, Model model){
if ("莱特雷".equals(username) && "123".equals(password)){
return "dashboard";
}
model.addAttribute("msg", "用户名或密码出现错误");
return "index";
}
}
|
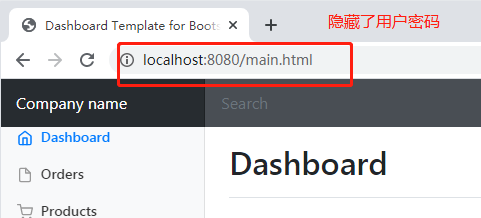
4.3 隐藏账号密码
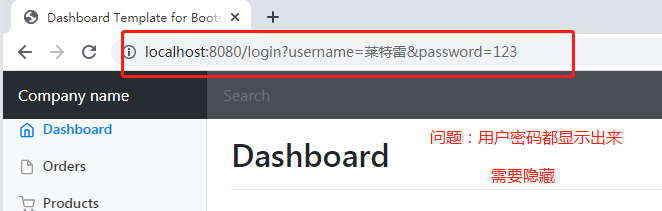
- (2)解决问题
- 在网页跳转在套一层跳转
- 用Controller跳转 / 拓展WebMvc配置类编写
1
2
3
4
5
6
7
8
9
10
| Controller修改
@RequestMapping("/login")
public String login(@RequestParam("username") String username, @RequestParam("password") String password, Model modeln){
if ("莱特雷".equals(username) && "123".equals(password)){
return "redirect:/main.html";
}
model.addAttribute("msg", "用户名或密码出现错误");
return "index";
}
|
1
2
3
4
5
6
7
8
9
10
11
12
| WebMvc配置页面跳转
@Configuration
public class WebMvcConfig implements WebMvcConfigurer {
@Override
public void addViewControllers(ViewControllerRegistry registry){
registry.addViewController("/").setViewName("index");
registry.addViewController("/index.html").setViewName("index");
registry.addViewController("/main.html").setViewName("dashboard");
}
|
五、添加拦截器
添加中间跳转隐藏密码出现新的问题:直接页面输入localhost:8080/main.html会绕过登录界面,此时需要配置拦截器来拦截下来
5.1 创建自定义的拦截器
- 类实现HandlerInterceptor接口,重写方法
1
2
3
4
5
6
7
8
9
10
11
12
13
| public class MyInterceptor implements HandlerInterceptor {
public boolean preHandle(HttpServletRequest request, HttpServletResponse response, Object handler) throws Exception {
Object login = request.getSession().getAttribute("UserLogin");
if (login == null){
request.setAttribute("msg", "没有权限,请先登录");
request.getRequestDispatcher("/index.html").forward(request, response);
return false;
}
return true;
}
}
|
5.2 修改Controller跳转
- 为了用户登录后返回一个Session,方便拦截器拦截
1
2
3
4
5
6
7
8
9
10
| @RequestMapping("/login")
public String login(@RequestParam("username") String username, @RequestParam("password") String password, Model model, HttpSession session){
if ("莱特雷".equals(username) && "123".equals(password)){
session.setAttribute("UserLogin", username);
return "redirect:/main.html";
}
model.addAttribute("msg", "用户名或密码出现错误");
return "index";
}
|
5.3 注册拦截器
1
2
3
4
5
6
7
8
9
10
11
12
13
14
15
16
17
18
19
20
21
22
23
24
25
| @Configuration
public class WebMvcConfig implements WebMvcConfigurer {
@Override
public void addViewControllers(ViewControllerRegistry registry){
registry.addViewController("/").setViewName("index");
registry.addViewController("/index.html").setViewName("index");
registry.addViewController("/main.html").setViewName("dashboard");
}
@Bean
public LocaleResolver localeResolver(){
return new MyLocaleResolver();
}
@Override
public void addInterceptors(InterceptorRegistry registry) {
registry.addInterceptor(new MyInterceptor()).addPathPatterns("/**").excludePathPatterns("/", "/index.html", "/login", "/asserts/**");
}
}
|
六、员工管理页面
为了方便管理,将展示员工list的页面放在”emp”文件夹下
6.1 编写Controller跳转
1
2
3
4
5
6
7
8
9
10
11
| @Controller
public class EmployeeController {
@RequestMapping("/emp/getEmps")
public String getEmps(Model model){
Collection<Employee> employees = EmployeeDao.getEmployees();
model.addAttribute("emps", employees);
return "emp/list";
}
}
|
6.2 修改页面
(1)代码复用
- 由于dashboard.html 和 list.html 有大量的重复代码(顶部导航栏、侧边栏)
- 为了方便修改,将重复代码提取,进行统一修改
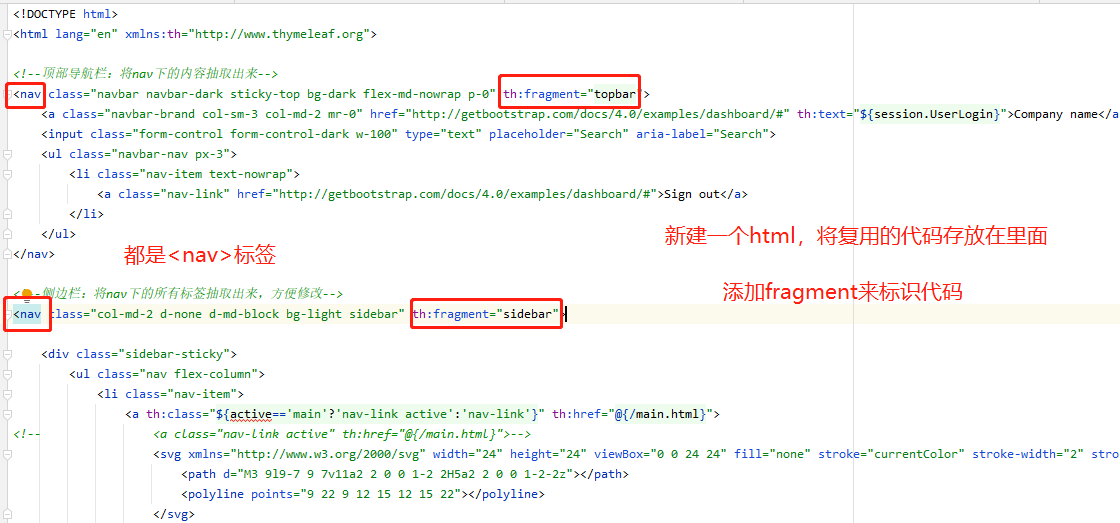
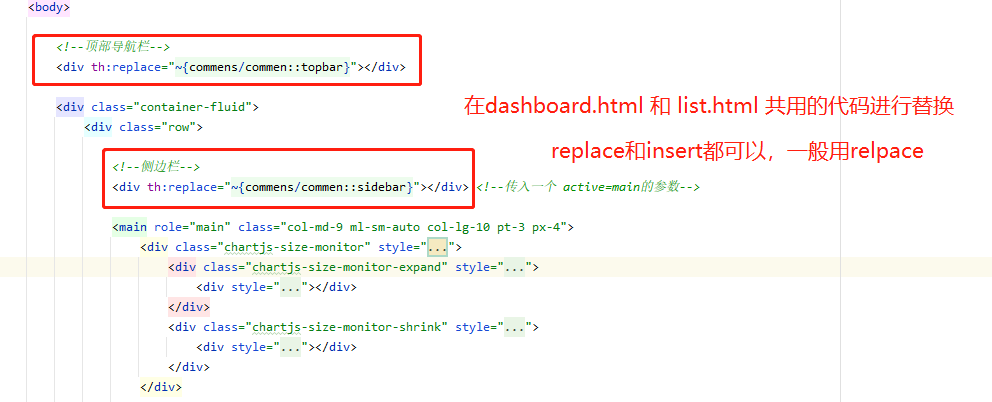
(2)修改复用代码
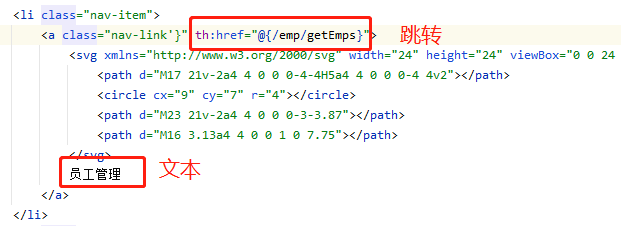
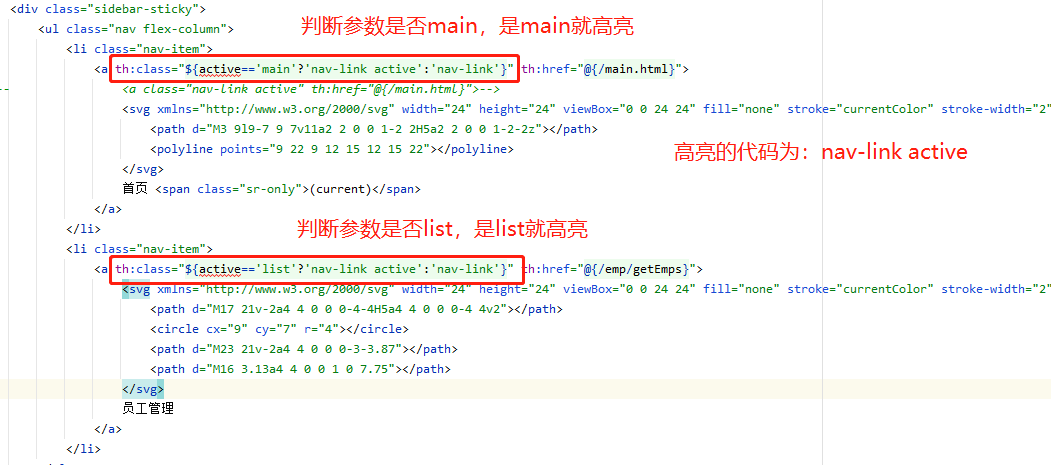
6.3 解决高亮问题
点击页面时,总是首先那个按钮会发亮,点击员工管理没发亮

\

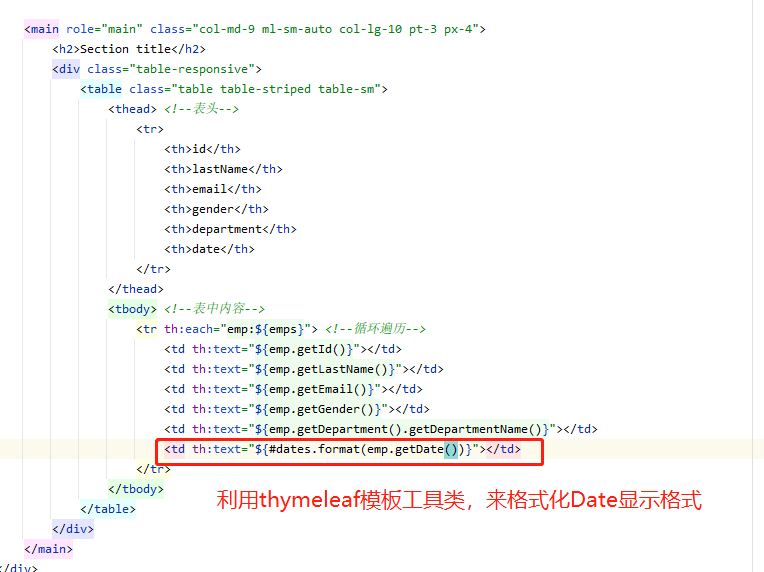
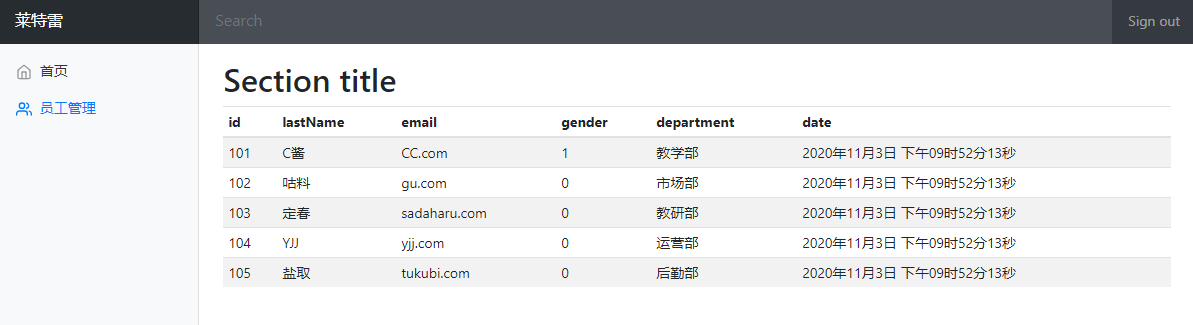
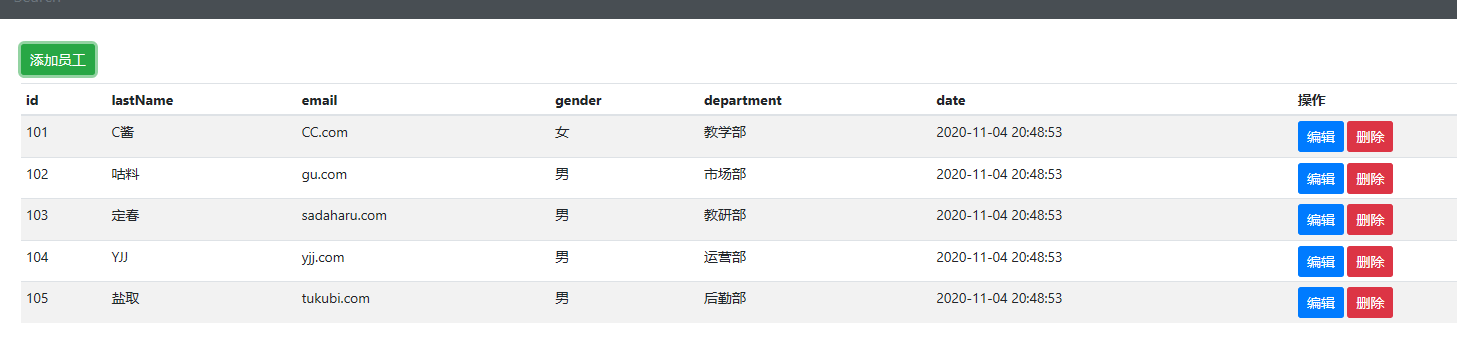
6.4 员工表单
修改list.html页面,将后端的数据提取出来,并放在一个表单中
七、添加员工功能
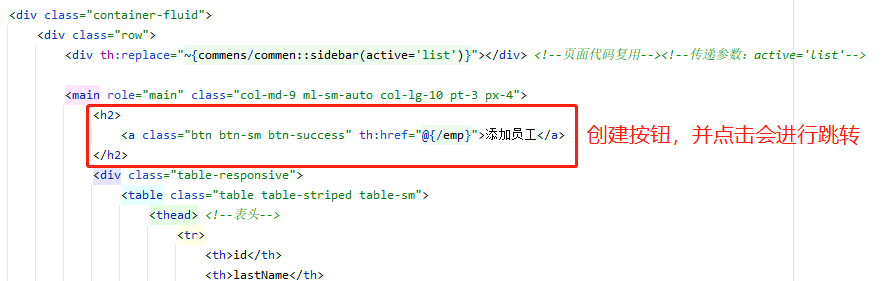
7.1 添加按钮
修改list.html页面,增加一个“添加员工”按钮,并跳转Contoller进行业务处理
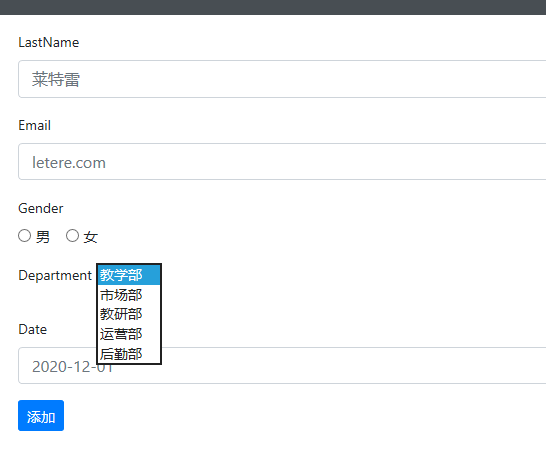
7.2 添加员工页面
复制list.html进行修改,变成add.html页面,把表内容删除,变成表单
1
2
3
4
5
6
7
8
9
10
11
12
13
14
15
16
17
18
19
20
21
22
23
24
25
26
27
28
29
30
31
32
33
34
35
36
37
| <main role="main" class="col-md-9 ml-sm-auto col-lg-10 pt-3 px-4">
<form th:action="@{/emp/addEmp}" method="post">
<div class="form-group">
<label>LastName</label>
<input type="text" name="lastName" class="form-control" placeholder="莱特雷">
</div>
<div class="form-group">
<label>Email</label>
<input type="text" name="email" class="form-control" placeholder="letere.com">
</div>
<div class="form-group">
<label>Gender</label><br/>
<div class="form-check form-check-inline">
<input class="form-check-input" type="radio" name="gender" value="0">
<label class="form-check-label">男</label>
</div>
<div class="form-check form-check-inline">
<input class="form-check-input" type="radio" name="gender" value="1">
<label class="form-check-label">女</label>
</div>
</div>
<div class="form-group">
<label>Department</label>
<select class="form-group" name="department.id">
<option th:each="dpet:${departments}" th:text="${dpet.getDepartmentName()}" th:value="${dpet.getId()}"></option>
</select>
</div>
<div class="form-group">
<label>Date</label>
<input type="text" name="date" class="form-control" placeholder="2020-12-01">
</div>
<button type="submit" class="btn btn-sm btn-primary">添加</button>
</form>
</main>
|
7.3 Controller创建相应的业务
1
2
3
4
5
6
7
8
9
10
11
12
13
14
15
16
17
18
| @Controller
public class EmployeeController {
@GetMapping("/emp")
public String toAddEmp(Model model){
Collection<Department> departments = DepartmentDao.getDepartMents();
model.addAttribute("departments", departments);
return "emp/add";
}
@RequestMapping("/emp/addEmp")
public String addEmp(Employee employee){
EmployeeDao.addEmployee(employee, employee.getDepartment().getId());
return "redirect:/emp/getEmps";
}
}
|
八、修改员工功能
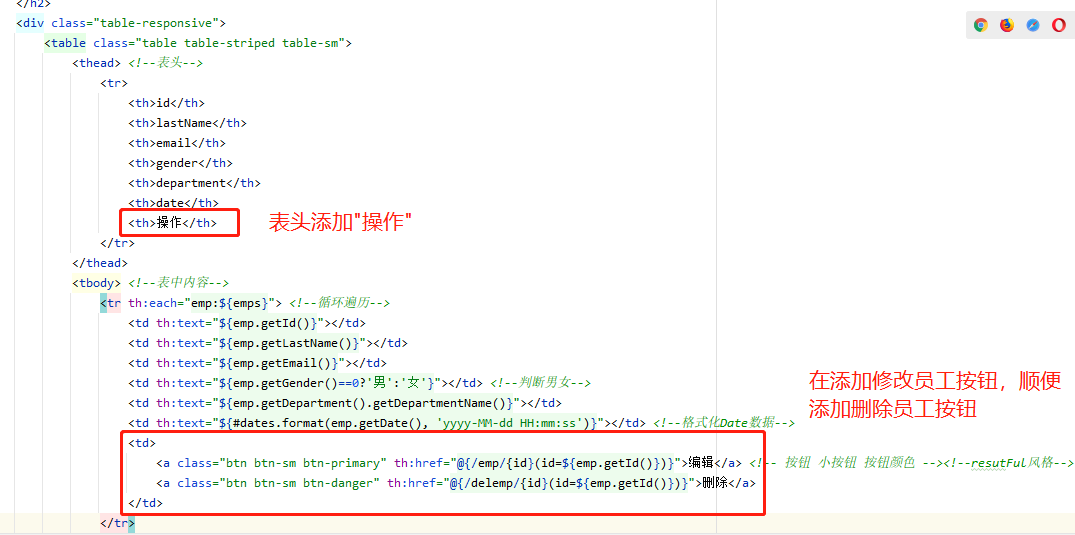
8.1 修改按钮
修改list.html,添加一个修改员工按钮
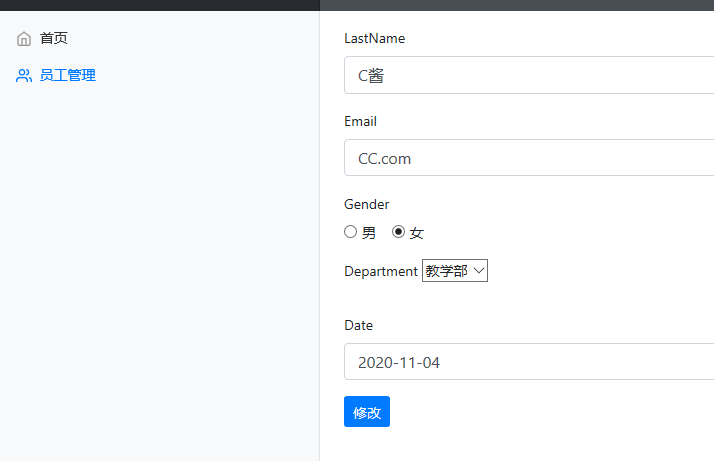
8.2 创建修改页面
复制add.html进行修改
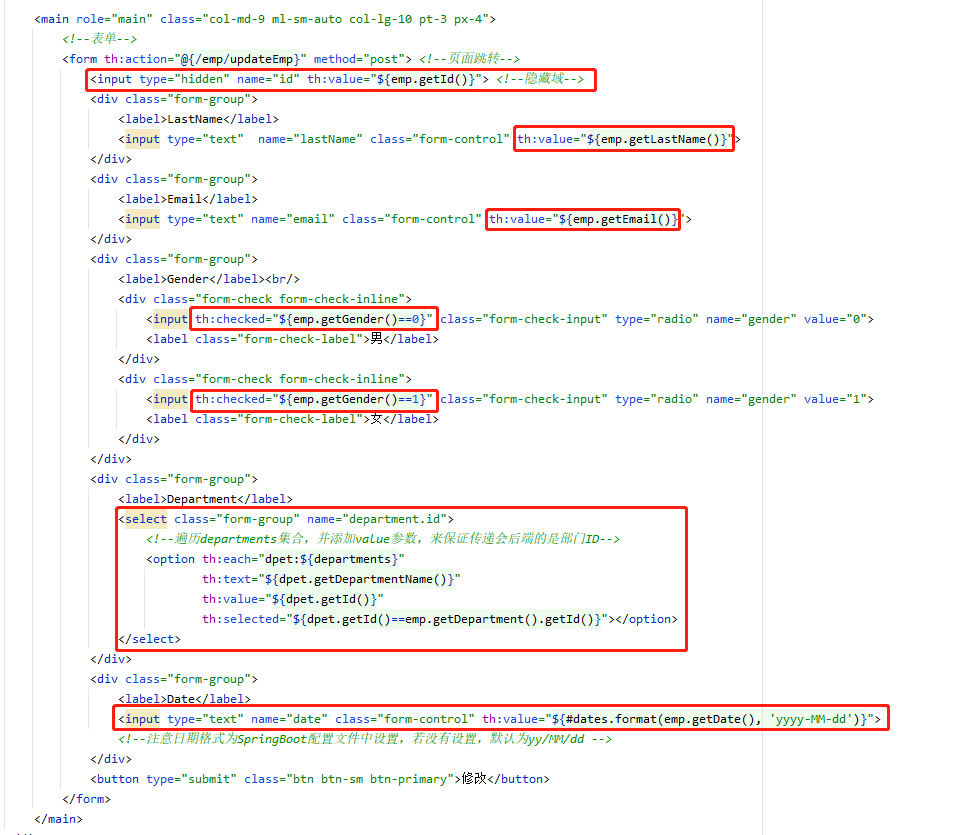
8.3 Controller创建相应业务
1
2
3
4
5
6
7
8
9
10
11
12
13
14
15
16
17
18
19
20
21
| @Controller
public class EmployeeController {
@RequestMapping("/emp/{id}")
public String toUpdateEmp(@PathVariable("id") Integer id, Model model){
Employee employee = EmployeeDao.getEmployeeById(id);
Collection<Department> departments = DepartmentDao.getDepartMents();
model.addAttribute("emp", employee);
model.addAttribute("departments", departments);
return "emp/update";
}
@RequestMapping("/emp/updateEmp")
public String updateEmp(Employee employee){
EmployeeDao.addEmployee(employee, employee.getDepartment().getId());
return "redirect:/emp/getEmps";
}
}
|
九、删除员工功能和收尾
9.1 Controller添加删除员工业务
1
2
3
4
5
6
7
8
9
10
11
| @Controller
public class EmployeeController {
@RequestMapping("/delemp/{id}")
public String deleteEmp(@PathVariable("id") Integer id){
EmployeeDao.delete(id);
return "redirect:/emp/getEmps";
}
}
|
9.2 添加错误页面
- 在templates文件夹下创建”error”文件夹,将对应的错误页面改名为错误代码,放进”error”文件夹,thymeleaf会自动跳转,不用填写相应跳转
9.3 添加注销功能

1
2
3
4
5
6
7
8
9
10
11
| @Controller
public class LoginController {
@RequestMapping("/logout")
public String logout(HttpSession session){
session.invalidate();
return "redirect:index.html";
}
}
|