了解Swagger,以及如何在SpringBoot中使用Swagger
一、Swagger的介绍和集成
1.1 Swagger介绍
- 号称世界上最流行的API框架
- ResutFul API文档在线自动生成工具 ==> API文档与API定义同步更新
- 直接运行,可以在线测试API接口
- 支持多种语言:Java…
- 官网:https://swagger.io
1.2 集成Swagger
1
2
3
4
5
6
7
8
9
10
11
12
13
14
15
16
17
18
19
20
|
<dependency>
<groupId>io.springfox</groupId>
<artifactId>springfox-swagger2</artifactId>
<version>3.0.0</version>
</dependency>
<dependency>
<groupId>io.springfox</groupId>
<artifactId>springfox-swagger-ui</artifactId>
<version>3.0.0</version>
</dependency>
<dependency>
<groupId>io.springfox</groupId>
<artifactId>springfox-boot-starter</artifactId>
<version>3.0.0</version>
</dependency>
|
3.0以下版本访问:http://localhost:8080/swagger-ui.html
3.0版本访问:http://localhost:8080/swagger-ui/index.html
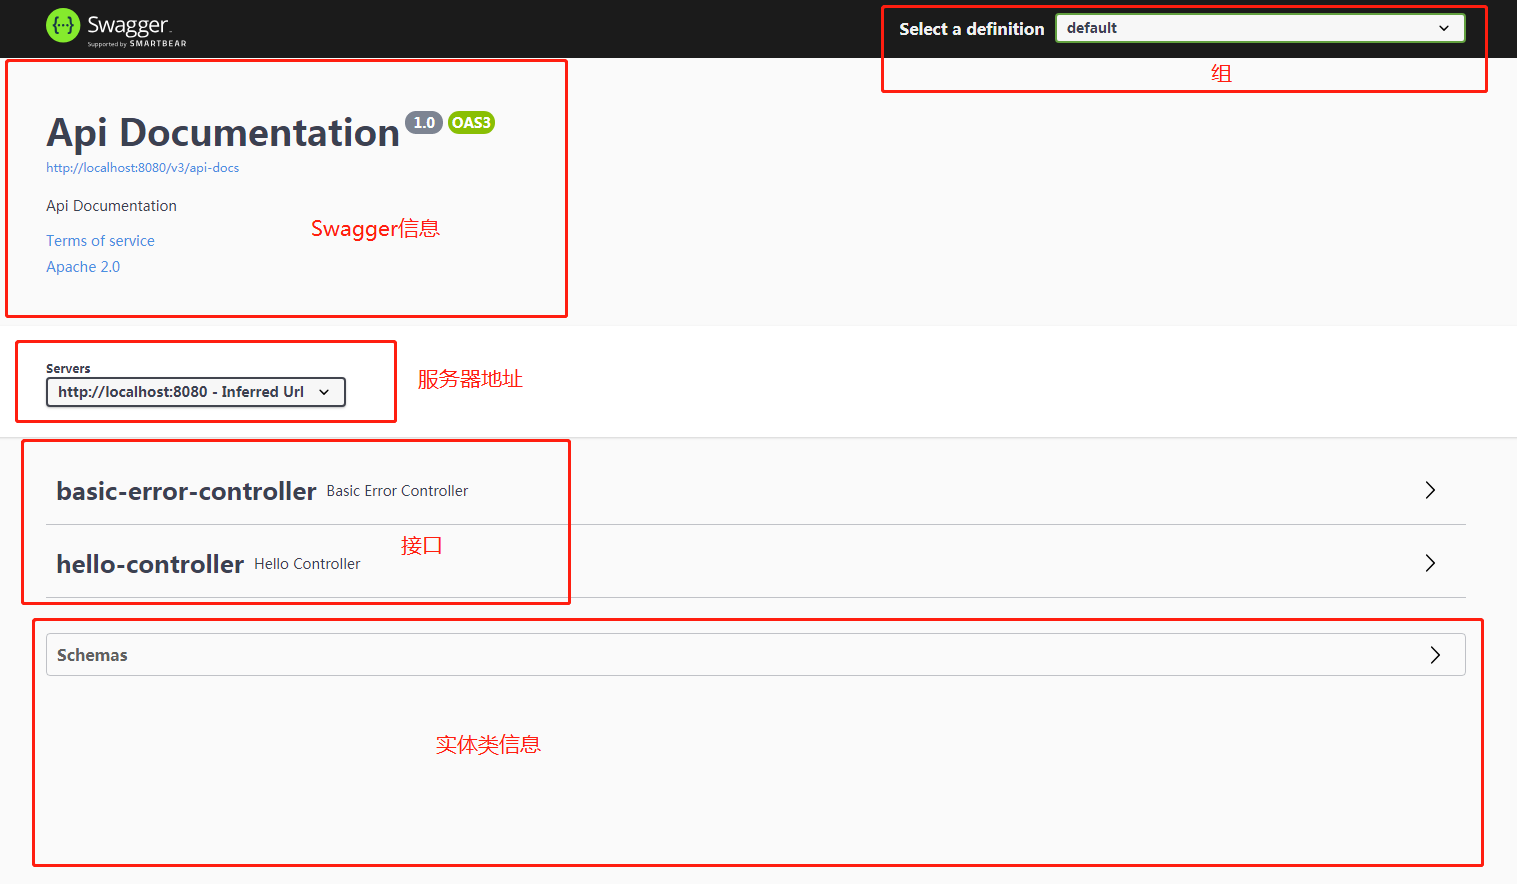
会出现以下页面
二、Swagger基础配置
2.1 创建Swagger配置类
1
2
3
4
5
| @Configuration
@EnableSwagger2
public class SwaggerConfig {
}
|
2.2 注入Docket类
Docket类为配置Swagger中主要配置内容
1
2
3
4
5
6
7
8
9
10
11
12
13
14
15
16
17
18
19
20
21
22
23
24
25
26
27
| Docket构造器
public Docket(DocumentationType documentationType) {
this.apiInfo = ApiInfo.DEFAULT;
this.groupName = "default";
this.enabled = true;
this.genericsNamingStrategy = new DefaultGenericTypeNamingStrategy();
this.applyDefaultResponseMessages = true;
this.host = "";
this.pathMapping = Optional.empty();
this.apiSelector = ApiSelector.DEFAULT;
this.enableUrlTemplating = false;
this.vendorExtensions = new ArrayList();
this.globalRequestParameters = new ArrayList();
this.documentationType = documentationType;
}
|| 查看Documentation类
public class DocumentationType extends SimplePluginMetadata {
public static final DocumentationType SWAGGER_12 = new DocumentationType("swagger", "1.2");
public static final DocumentationType SWAGGER_2 = new DocumentationType("swagger", "2.0");
public static final DocumentationType OAS_30 = new DocumentationType("openApi", "3.0");
@Deprecated
public static final DocumentationType SPRING_WEB = new DocumentationType("spring-web", "5.2");
......
}
|
1
2
3
4
5
6
7
8
9
10
11
12
| @Configuration
@EnableSwagger2
public class SwaggerConfig {
@Bean
public Docket getDokcet(Environment environment){
Docket docket = new Docket(DocumentationType.SWAGGER_2);
return docket;
}
|
2.3 修改Swagger信息
调用Docket类中的apiInfo方法
1
2
3
4
5
6
7
8
9
10
11
12
13
14
15
16
17
18
19
20
21
22
23
24
25
26
27
28
29
30
31
32
33
34
35
36
37
38
| apiInfo方法
public Docket apiInfo(ApiInfo apiInfo) {
this.apiInfo = (ApiInfo)BuilderDefaults.defaultIfAbsent(apiInfo, this.apiInfo);
return this;
}
|| 查看ApiInfo类
public class ApiInfo {
public static final Contact DEFAULT_CONTACT = new Contact("", "", "");
public ApiInfo(String title, String description, String version, String termsOfServiceUrl, Contact contact, String license, String licenseUrl, Collection<VendorExtension> vendorExtensions) {
this.title = title;
this.description = description;
this.version = version;
this.termsOfServiceUrl = termsOfServiceUrl;
this.contact = contact;
this.license = license;
this.licenseUrl = licenseUrl;
this.vendorExtensions = new ArrayList(vendorExtensions);
}
static {
DEFAULT = new ApiInfo("Api Documentation", "Api Documentation", "1.0", "urn:tos", DEFAULT_CONTACT, "Apache 2.0", "http://www.apache.org/licenses/LICENSE-2.0", new ArrayList());
}
}
Contact类(传参需要的参数之一)
public class Contact {
public Contact(String name, String url, String email) {
this.name = name;
this.url = url;
this.email = email;
}
}
|
1
2
3
4
5
6
7
8
9
10
11
12
13
14
15
16
17
18
19
20
21
22
23
24
25
26
27
28
29
30
| @Configuration
@EnableSwagger2
public class SwaggerConfig {
@Bean
public Docket getDokcet(Environment environment){
Docket docket = new Docket(DocumentationType.SWAGGER_2);
docket.apiInfo(getApiInfo());
return docket;
}
private ApiInfo getApiInfo(){
Contact contact = new Contact("莱特雷", "http://letere.gitee.io/blog", "Xxxx@qq.com");
return new ApiInfo("letere",
"修改的是Swagger信息",
"1.0",
"urn:tos",
contact,
"Apache 2.0",
"http://www.apache.org/licenses/LICENSE-2.0",
new ArrayList());
};
}
|

三、配置扫描接口
使用Docket.select()方法类配置
3.1 修改SwaggerConfig配置类
1
2
3
4
5
6
7
8
9
10
11
12
13
14
15
16
17
18
19
20
21
22
23
24
25
26
27
28
29
30
| @Configuration
@EnableSwagger2
public class SwaggerConfig {
@Bean
public Docket getDokcet(Environment environment){
Docket docket = new Docket(DocumentationType.SWAGGER_2);
docket.apiInfo(getApiInfo());
docket.select().apis(RequestHandlerSelectors.basePackage("com.letere.controller")).build();
return docket;
}
}
|
四、配置开关
实现多环境时,判断是否使用Swagger
一般在开发环境中会使用Swagger,生产环境会关闭Swagger
4.1 方式一:通过Application.yaml设置
在application.yaml中有以下设置来控制Swagger是否开启
可以在不同的环境,选择是否开启
1
2
3
4
| springfox:
documentation:
swagger-ui:
enabled: true
|
4.2 方式二:在Docket中设置
可以调用Docket.enable()方法,可以选择开启/关闭Swagger,重点在与如何获取当前的环境,来进行判断
1
2
3
4
5
6
7
8
9
10
11
12
13
14
15
16
17
18
19
20
21
22
23
24
25
26
| @Configuration
@EnableSwagger2
public class SwaggerConfig {
@Bean
public Docket getDokcet(Environment environment){
Docket docket = new Docket(DocumentationType.SWAGGER_2);
docket.apiInfo(getApiInfo());
docket.select().apis(RequestHandlerSelectors.basePackage("com.letere.controller")).build();
Profiles profiles = Profiles.of("dev");
boolean b = environment.acceptsProfiles(profiles);
if (!b){
docket.enable(false);
}
return docket;
}
}
|
五、添加分组和注释注解
5.1 添加分组
Docket类中使用Docket.group()方法,可以给组起名字
如果需要创建多个分组,只能创建多个Docket类
1
2
3
4
5
6
7
8
9
10
11
12
13
14
15
16
17
18
19
20
21
22
23
24
25
26
27
28
29
| @Configuration
@EnableSwagger2
public class SwaggerConfig {
@Bean
public Docket getDokcet(Environment environment){
Docket docket = new Docket(DocumentationType.SWAGGER_2);
docket.apiInfo(getApiInfo());
docket.select().apis(RequestHandlerSelectors.basePackage("com.letere.controller")).build();
Profiles profiles = Profiles.of("dev");
boolean b = environment.acceptsProfiles(profiles);
if (!b){
docket.enable(false);
}
docket.groupName("莱特雷");
return docket;
}
}
|
5.2 注释注解
Swagger可以添加注释注解,来给类的方法,属性…添加注释,方便Swagger后台查看
1
2
3
4
5
| @ApiModel("用户")
public class User {
@ApiModelProperty("用户名")
@ApiModelProperty("密码")
private String password;
|
1
2
3
4
5
6
7
8
9
| @RestController
public class HelloController {
@ApiOperation("返回用户")
@GetMapping("/user")
public User user(){
return new User();
}
}
|
5.3 常用注解
1
2
|
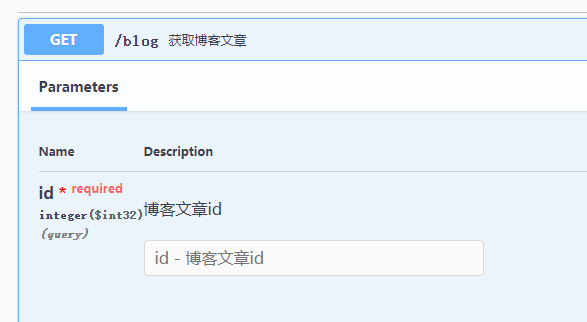
@ApiOperation("获取博客文章")
|

- (2)ApiImplicitParam 和 ApiImplicitParams
- ApiImplicitParam对接口的参数进行解释说明
- 而ApiImplicitParams用于包裹多个ApiImplicitParam
1
2
3
4
5
6
7
8
9
10
11
12
13
14
|
@ApiImplicitParams({
@ApiImplicitParam(),
@ApiImplicitParam()
})
@ApiImplicitParam(name = "id", value = "博客文章id", dataType = "int", allowMultiple = true, required = true)
|
- (3)ApiParam
- 使用效果和ApiImplicitParam一致,使用的位置直接在参数上
- 因此可以省略“name”参数名和”dataType”参数数据类型的属性
- 参数类型为文件(MultipartFile)的只能使用此注解
1
| public void test(@ApiParam(value = "文件", required = true) MultipartFile file) {}
|
- (4)RequestPart
- swagger3.x版本,若参数为文件,则需要此注解(2.x版本不需要)
1
| public void test(@ApiParam(value = "文件", required = true) @RequestPart MultipartFile file) {}
|
