关于前端路由的讲解,前端路由的讲解暂时以cli2.x进行
一、前后端渲染和路由
1.1 后端路由阶段
1.2 前后端分离阶段
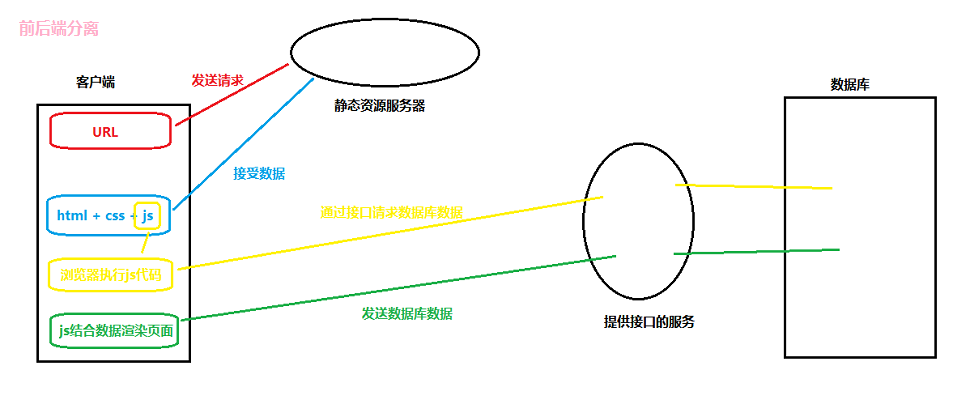
- 前端渲染:
- 浏览器中显示的页面中大部分内容,都是前端些的js代码在浏览器中执行,最终渲染出来的页面
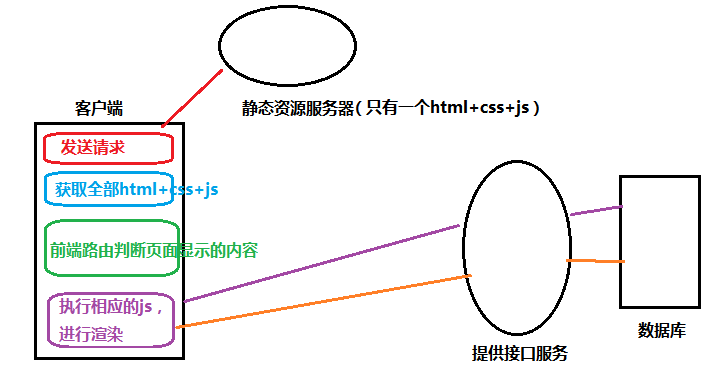
1.3 单页面富应用阶段
- 简称SPA(single page application)
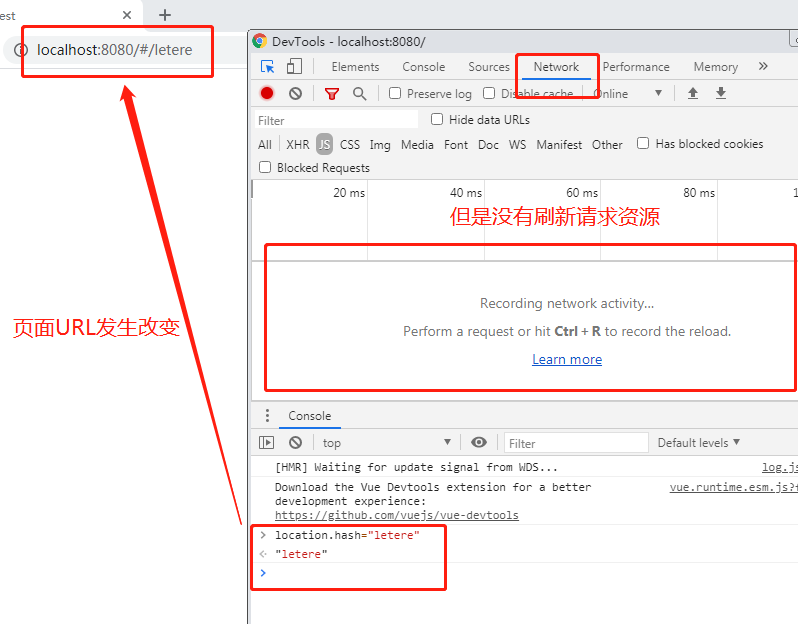
二、URL变化页面不刷新
2.1 hash值
2.2 HTML5history模式
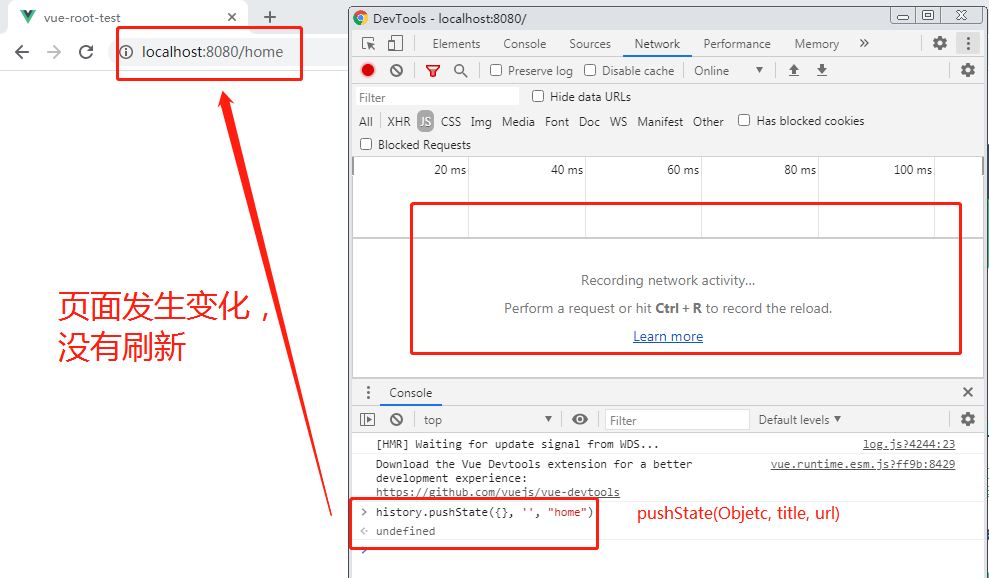
- 因为pushState()本质是将路由url存放在栈里,所以可以执行以下操作
- (4)history.go(-1) == history.back()
- (5)history.go(1) == history.forward()
三、vue-router安装和配置
3.1 安装
- (1)webpack项目:
npm install vue-router --save
3.2 配置路由
(1)webpack项目:
1
2
3
4
5
6
7
8
9
10
11
12
13
14
15
16
|
import Vue from 'vue'
import Router from 'vue-router'
Vue.use(Router)
const routes = [];
const router = new Router({
routes
});
export default router;
|
1
2
3
4
5
6
7
8
9
10
|
import Vue from 'vue'
import App from './App'
import router from './router/index.js'
new Vue({
el: '#app',
router,
render: h => h(App)
})
|
(2)vue cli项目
四、路由映射配置
4.1 创建路由组件
1
2
3
4
5
6
7
8
9
10
11
12
13
14
15
| <template>
<div>
<h2>我是首页</h2>
</div>
</template>
<script>
export default {
name: "home"
}
</script>
<style scoped>
</style>
|
4.2 配置路由映射
1
2
3
4
5
6
7
8
9
10
11
12
13
14
15
16
17
18
19
| import Vue from 'vue'
import Router from 'vue-router'
import Home from "../components/home"
Vue.use(Router)
const routes = [
{
path: "/home",
component: Home
}
]
const router = new Router({
routes
});
export default router;
|
4.3 首页设置
1
2
3
4
5
6
7
8
9
10
11
12
13
14
15
| <template>
<div id="app">
<router-link to="/home">首页</router-link>
<router-view></router-view>
</div>
</template>
<script>
export default {
name: 'App'
}
</script>
<style>
</style>
|
4.4 配置默认路径
1
2
3
4
5
6
7
8
9
10
11
|
const routes = [
{
path: "/",
redirect: '/home'
},
{
path: "/home",
component: Home
}
]
|
4.5 使用history模式
- vue-router路由跳转,默认使用hash跳转,所以页面会出现
localhost:8080/#/home,为了去掉’#’,可以使用history模式
1
2
3
4
5
|
const router = new Router({
routes,
mode: 'history'
});
|
五、router-link属性补充
5.1 tag属性
1
| <router-link to="/home" tag="button">首页</router-link>
|
- 页面最终渲染
<router-link>标签默认为<a>标签,可以通过tag属性修改要渲染的标签
5.2 replace属性
1
| <router-link to="/home" tag="button" replace>首页</router-link>
|
- 如果该前端路由使用history模式,但是不想该页面跳转可以返回,用replace来禁止页面返回跳转
5.3 active-class属性
<router-link>标签被点击时,会在class产生一个’router-link-active’属性,可以通过该属性来设置点击时的样式,但是如果嫌名称过长,可以通过active-class来进行修改
1
| <router-link to="/home" tag="button" replace active-class="active">首页</router-link>
|
- 如果修改的
router-link标签过多,可以在router的index.js进行统一设置
1
2
3
4
| const router = new Router({
routes,
linkActiveClass: 'active'
});
|
六、路由代码跳转
- 我们可以不使用
<router-link>标签,通过其他标签,监听点击,在方法中通过代码实现路由跳转
1
2
3
4
5
6
7
8
9
10
11
12
13
14
15
16
17
18
19
20
21
22
23
|
<template>
<div id="app">
<button @click="homeClick()">首页</button>
<router-view></router-view>
</div>
</template>
<script>
export default {
name: 'App',
methods: {
homeClick() {
this.$router.replace("/home");
}
}
}
</script>
<style>
</style>
|
七、动态路由
- 前端路由跳转时,跳转的参数时不确定的,动态的实现方法
7.1 搭建基础的路由
1
2
3
4
5
6
7
8
9
10
11
12
13
14
15
16
|
<template>
<div>
<h2>我是用户</h2>
</div>
</template>
<script>
export default {
name: "user"
}
</script>
<style scoped>
</style>
|
1
2
3
4
5
6
7
8
9
10
11
12
13
14
15
16
17
18
19
20
|
import Vue from 'vue'
import Router from 'vue-router'
import User from "../components/user"
Vue.use(Router)
const routes = [
{
path: "/user",
component: User
}
]
const router = new Router({
routes,
mode: 'history',
});
export default router;
|
1
2
3
4
5
6
7
8
9
10
11
12
13
14
15
16
17
18
|
<template>
<div id="app">
<router-link to="/user" replace tag="button">用户</router-link>
<router-view></router-view>
</div>
</template>
<script>
export default {
name: 'App'
}
}
</script>
<style>
</style>
|
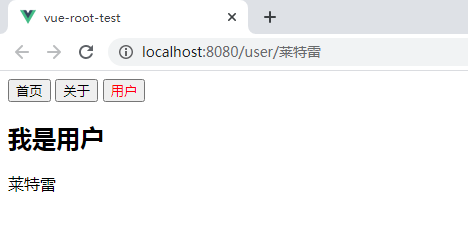
7.2 进行动态设置
1
2
3
4
5
6
7
8
9
10
|
...
const routes = [
{
path: "/user/:userName",
component: User
}
]
...
|
1
2
3
4
5
6
7
8
9
10
11
12
13
14
15
16
17
18
19
|
<template>
<div id="app">
<router-link :to="'/user/' + userName" replace tag="button">用户</router-link>
<router-view></router-view>
</div>
</template>
<script>
export default {
name: 'App',
data() {
return {
userName: "莱特雷"
}
}
}
</script>
...
|
1
2
3
4
5
6
7
8
|
<template>
<div>
<h2>我是用户</h2>
{{$route.params.userName}}
</div>
</template>
...
|
八、路由懒加载
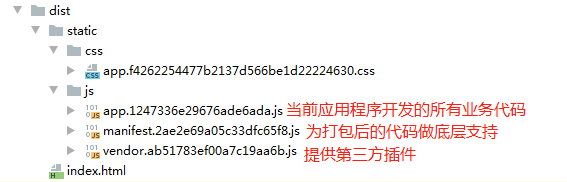
8.1 打包目录解析
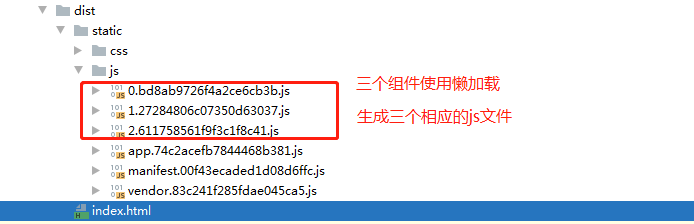
8.2 懒加载认识
- 因为打包时会把所有业务代码打包在一个app的js文件上,会导致文件巨大,加载该文件时,可能会出现短暂的空白
- 使用懒加载,将不同路由组件打包成不同的代码块,用户访问到该路由时再加载,用户体验上升
8.3 懒加载使用
- (1)写法一
- 结合Vue异步组件和Webpack代码的分析(旧)
1
2
3
4
5
| const Home = resolve => {
require.ensure(['..componets/Home.vue'], () => {
resolve(require('../components/Home.vue'))
})
}
|
1
| const Home = resolve => require(['../components/Home.vue'], resolve)
|
- (3)写法三
- ES6写法,组织Vue异步组件和Webpack的代码分割
1
| const Home = () => import('..components/Home.vue')
|
8.4 例子改写和打包结果
1
2
3
4
5
6
7
8
|
const Home = () => import("../components/home");
const About = () => import("../components/about");
const User = () => import("../components/user");
|
九、路由嵌套
- 在home的页面下创建一个子路由”/home/news”
9.1 创建组件
1
2
3
4
5
6
7
8
9
10
11
12
13
14
15
16
| // ./components/homeNews.vue
<template>
<div>
<h3>这里是新闻哦!</h3>
</div>
</template>
<script>
export default {
name: "homeNews"
}
</script>
<style scoped>
</style>
|
9.2 路由注册
1
2
3
4
5
6
7
8
9
10
11
12
13
14
15
16
17
18
19
20
21
22
23
24
25
| ...
const HomeNews = () => import("../components/homeNews")
...
const routes = [
{
path: "/",
redirect: '/home'
},
{
path: "/home",
component: Home,
children: [
{
path: "",
redirect: "news"
},
{
path: "news",
component: HomeNews
}
]
}
]
...
|
9.3 home页面修改
1
2
3
4
5
6
7
8
| <template>
<div>
<h2>我是首页</h2>
<router-link to="/home/news" tag="button">新闻</router-link>
<router-view></router-view>
</div>
</template>
...
|
十、参数传递
10.1 动态路由的方式
10.2 query类型
1
2
3
4
5
6
7
|
<template>
<div>
<h2>这里是profile组件</h2>
</div>
</template>
...
|
1
2
3
4
5
6
7
8
9
10
11
|
const Profile = () => import("../components/profile");
...
const routes = [
...
{
path: "/profile",
component: Profile
}
]
|
1
2
3
4
5
6
7
8
9
|
<template>
<div id="app">
...
<router-link to="/profile" tag="button">档案</router-link>
<router-view></router-view>
</div>
</template>
...
|
1
2
3
4
5
6
7
8
9
10
|
<template>
...
<router-link :to="{path: '/profile', query: {name: '莱特雷', age: 18, sex: '男'}}" tag="button">档案</router-link>
<router-view></router-view>
</div>
</template>
...
|
1
2
3
4
5
6
7
8
9
10
11
|
<template>
<div>
<h2>这里是profile组件</h2>
<h3>{{$route.query}}</h3>
<h3>{{$route.query.name}}</h3>
<h3>{{$route.query.age}}</h3>
<h3>{{$route.query.sex}}</h3>
</div>
</template>
...
|
十一、全局导航守卫
- 实现功能:在每次页面跳转时,修改当前标题为当前页面名称
11.1 利用生命周期函数实现
- created():在页面生成时,会自动调用此函数,利用此来进行修改页面标题
1
2
3
4
5
6
7
8
9
10
11
12
13
14
15
|
<template>
<div>
<h2>我是关于</h2>
</div>
</template>
<script>
export default {
name: "about",
created() {
document.title = "关于"
}
}
</script>
|
11.2 利用全局导航守卫
- (1)函数源码分析
- 利用路由器对象的beforeEach()方法进行使用全局导航守卫,路由跳转时会使用自动调用此函数
1
2
3
4
5
6
7
8
| beforeEach(guard: NavigationGuard): Function
||跳转NavigationGuard
export type NavigationGuard<V extends Vue = Vue> = (
to: Route,
from: Route,
next: NavigationGuardNext<V>
) => any
|
1
2
3
4
5
6
7
8
9
10
11
12
13
14
15
|
const routes = [
{
path: "/",
redirect: '/home'
},
{
path: "/home",
component: Home,
meta: {
title: "首页"
}
}
...以此类推
]
|
1
2
3
4
5
6
7
8
9
10
|
const router = new Router({
routes
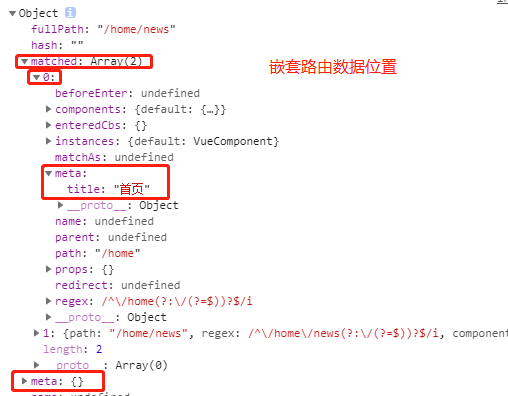
});
router.beforeEach((to, from, next) => {
document.title = to.matched[0].meta.title;
next();
})
|
11.3 全局导航守卫补充
- (1)全局守卫处理beforeEach之外,还有afterEach,分别在路由跳转前/路由跳转后执行
1
2
3
4
|
router.afterEach((to, from) => document.title = to.matched[0].meta.title);
|
- (2)处了全局导航守卫之外,还有组件内的守卫和路由独享的守卫
十二、keep-alive
- keep-alive 是Vue内置的一个组件,可以是被包含的组件保留状态,或避免重新渲染
- route-view也是一个组件,如果直接被抱在keep-alive里面,所有的路径匹配到的视图组件都被缓存,不会立即销毁
12.1 keepp-alive实现功能
- 需求,点击首页的子路由时,记录点击的子路由,返回首页时,自动跳转到该子路由,而不是默认了的子路由
1
2
3
4
5
6
7
8
9
10
11
12
13
|
<template>
<div id="app">
<router-link to="/home" tag="button" replace active-class="active">首页</router-link>
<router-link to="/about" tag="button" replace active-class="active">关于</router-link>
<router-link :to="'/user/' + userName" replace tag="button">用户</router-link>
<router-link :to="{path: '/profile', query: {name: '莱特雷', age: 18, sex: '男'}}" tag="button">档案</router-link>
<keep-alive>
<router-view></router-view>
</keep-alive>
</div>
</template>
|
1
2
3
4
5
6
7
8
9
10
11
12
13
14
15
16
17
18
19
20
|
<script>
export default {
name: "home",
data() {
return {
path: "/home/news"
}
},
activated() {
this.$router.replace(this.path);
},
beforeRouteLeave(to, from, next) {
this.path = from.path;
next();
}
}
</script>
|