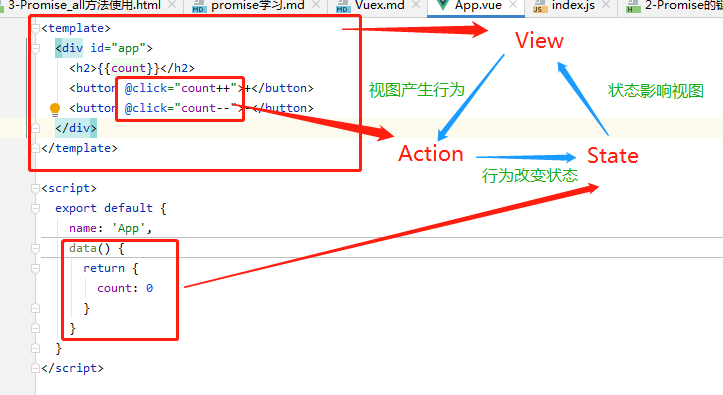
Vuex为Vue的一个状态管理插件,用于管理不同组建的同一状态
一、认识Vuex
1.1 简单介绍
- Vuex是专门为Vue.js应用程序开发的状态管理工具
- 状态管理可以简单认为是一组变量,用来存储状态
- 使用共享的状态情况
- 例如:用户的登录状态,用户的名称,头像,地理位置等等。
- 例如:商品的收藏,购物车的物品
二、单页面到多页面状态管理切换
2.1 单页面状态管理
2.2 多页面状态管理
- (1)安装Vuex
npm install Vuex --save
- (2)配置Vuex
- 创建一个新的文件夹store,在里面创建index.js来配置Vuex
1
2
3
4
5
6
7
8
9
10
11
12
13
14
15
16
17
18
19
20
21
22
23
24
25
26
27
| import Vue from 'vue';
import Vuex from 'vuex';
Vue.use(Vuex);
const store = new Vuex.Store({
state: {
counter: 100,
},
mutations: {
},
actions: {
},
getters: {
},
modules: {
}
});
export default store;
|
1
2
3
4
5
6
7
| ...
import store from "./store";
new Vue({
...
store
})
|
1
2
3
4
5
6
7
8
9
10
11
12
13
14
15
| <template>
<div id="app">
<h2>{{$store.state.counter}}</h2>
<button @click="$store.state.counter++">+</button>
<button @click="$store.state.counter--">-</button>
</div>
</template>
<script>
...
</script>
<style>
...
</style>
|
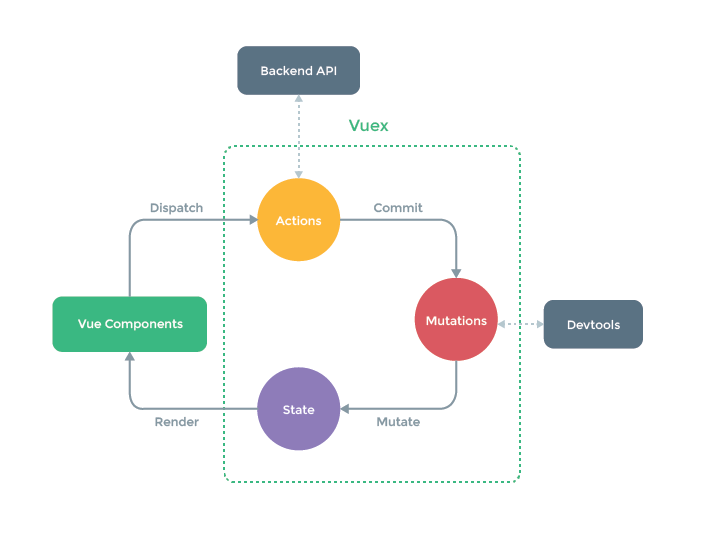
三、Vuex的状态修改
- 官方推荐通过修改actions来操作mutations,再通过mutations来修改state
- 当然,官方也推荐直接操作mutations,actions操作只是支持异步操作,mutations是同步操作
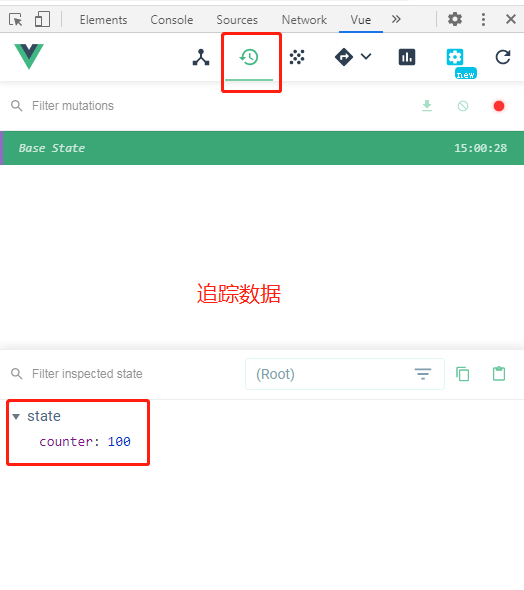
- 为了追踪状态的修改,官方提供浏览器插件devtools来进行追踪
3.2 使用mutations修改状态
1
2
3
4
5
6
7
8
9
10
11
12
13
14
15
16
17
18
|
...
const store = new Vuex.Store({
state: {
counter: 100,
},
mutations: {
increment(state) {
state.counter++;
},
decrement(state) {
state.counter--;
}
}
});
...
|
1
2
3
4
5
6
7
8
9
|
<template>
<div id="app">
<h2>{{$store.state.counter}}</h2>
<button @click="$store.commit('increment')">+</button>
<button @click="$store.commit('decrement')">-</button>
</div>
</template>
...
|
四、Vuex的核心概念
4.1 State
- 单一状态树:单一数据源,即无论表示状态的数据有多少,都放在同一个store对象中,不允许创建新的store来分类存放其他状态
4.2 Getters
1
2
3
4
5
6
7
8
9
10
11
12
|
const store = new Vuex.Store({
...
state: {
counter: 100,
},
getters: {
x2Counter(state) {
return state.counter * 2;
}
}
});
|
1
2
3
4
5
6
|
<template>
<div id="app">
<h2>{{"x2:" + $store.getters.x2Counter}}</h2>
</div>
</template>
|
1
2
3
4
5
6
7
8
9
10
11
12
13
14
15
16
17
18
19
20
21
22
|
const store = new Vuex.Store({
state: {
counter: 100,
}
getters: {
x2Counter(state) {
return state.counter * 2;
},
x4Counter(state, getters){
return getters.x2Counter * 2;
},
xNCounter(state){
return function (n) {
return state.counter * n;
}
}
}
});
|
1
2
3
4
5
6
7
|
<template>
<div id="app">
<h2>{{"x4:" + $store.getters.x4Counter}}</h2>
<h2>{{"xN:" + $store.getters.xNCounter(8)}}</h2>
</div>
</template>
|
4.3 Mutation
1
2
3
4
5
6
7
8
9
10
11
12
13
14
|
...
const store = new Vuex.Store({
state: {
counter: 100,
},
mutations: {
customIncrement(state, n){
state.counter += n;
}
}
...
});
...
|
1
2
3
4
5
6
7
|
<template>
<div id="app">
<h2>{{$store.state.counter}}</h2>
<button @click="$store.commit('customIncrement', 5)">+5</button>
</div>
</template>
|
1
2
3
4
5
6
7
8
9
10
11
12
13
| ...
const store = new Vuex.Store({
state: {
counter: 100,
},
mutations: {
customIncrement2(state, payload){
state.counter += payload.n;
}
}
...
});
...
|
1
2
3
4
5
6
| <template>
<div id="app">
<h2>{{$store.state.counter}}</h2>
<button @click="$store.commit({type: 'customIncrement2', n: 10})">+10</button>
</div>
</template>
|
(3)mutation响应规则
(4)mutation的类型常量
- 为了组件中使用mutation方法时不写错,可以定义一个常量来保存方法名,然后倒入此常量进行调用
- 类似Java的枚举类
1
2
3
4
|
export const INCREMENT = "increment";
export const DECREMENT = "decrement";
export const CUSTOMINCREMENT = "customIncrement";
|
1
2
3
4
5
6
7
8
9
10
11
12
13
14
15
|
<script>
...
import {INCREMENT, DECREMENT, CUSTOMINCREMENT} from "./store/mutation-types";
export default {
...
methods: {
increment() {
this.$store.commit(INCREMENT);
}
}
}
</script>
|
1
2
3
4
5
6
7
8
9
10
11
12
13
14
15
16
17
|
import {INCREMENT, DECREMENT, CUSTOMINCREMENT} from "./store/mutation-types";
...
const store = new Vuex.Store({
...
mutations: {
[INCREMENT](state) {
state.counter++;
}
}
});
|
4.4 Actions
1
2
3
4
5
6
7
8
9
10
11
12
13
14
15
16
17
|
const store = new Vuex.Store({
...
mutations: {
updateInfo(state){
this.state.info.name = "C酱";
}
},
actions: {
aUpdateInfo(context) {
setTimeout(() => {
context.commit('updateInfo');
}, 1000)
}
}
});
|
1
2
3
4
5
6
7
8
9
10
11
12
|
<script>
...
export default {
...
methods: {
updateInfo() {
this.$store.dispatch('aUpdateInfo');
}
}
}
</script>
|
1
2
3
4
5
6
7
8
9
10
11
12
13
14
15
16
17
| const store = new Vuex.Store({
...
mutations: {
updateInfo(state){
this.state.info.name = "C酱";
}
},
actions: {
aUpdateInfo2(context, payload){
setTimeout(() => {
context.commit('updateInfo');
console.log(payload);
}, 1000)
}
}
});
|
1
2
3
4
5
6
7
8
9
10
11
| <script>
...
export default {
...
methods: {
updateInfo2() {
this.$store.dispatch('aUpdateInfo2', "我是payLoad!");
}
}
}
</script>
|
1
2
3
4
5
6
7
8
9
10
11
12
13
14
15
16
17
18
19
20
21
22
| const store = new Vuex.Store({
...
mutations: {
updateInfo(state){
this.state.info.name = "C酱";
}
},
actions: {
aUpdateInfo3(context, payload){
setTimeout(() => {
context.commit('updateInfo');
return new Promise(resolve => {
console.log(payload);
})
})
}
}
});
|
1
2
3
4
5
6
7
8
9
10
11
12
13
| <script>
...
export default {
...
methods: {
updateInfo3() {
this.$store.dispatch('aUpdateInfo3', "我是前台消息").then(() => {
console.log("前台打印:处理已完成!")
})
}
}
}
</script>
|
4.5 Modules
- 因为Vuex要求使用单一状态树,会导致state会变得很臃肿,所以可以在modules中设置store对象,进行进一步细分
1
2
3
4
5
6
7
8
9
10
11
12
13
14
15
16
17
18
19
20
21
22
23
24
25
26
27
28
29
30
31
32
33
34
35
|
const a = {
state: {
name: "C酱"
},
mutations: {
changeName(state) {
state.name = "莱特雷";
}
},
actions: {
aChangeName(context) {
setTimeout(() => {
context.commit('changeName');
}, 1000)
}
},
getters: {
fullName(state) {
return "秃头" + state.name;
},
connect(state, getters, rootState){
return getters.fullName + " plus " + rootState.info.name;
}
}
}
const store = new Vuex.Store({
...
modules: {
a
}
});
|
1
2
3
4
5
6
7
8
9
10
11
|
<template>
<div id="app">
<h2>----- Modules使用 -----</h2>
<h3>{{$store.state.a.name}}</h3>
<button @click="$store.commit('changeName')">mutations使用</button>
<button @click="$store.dispatch('aChangeName')">actions使用</button>
<h3>{{$store.getters.connect + '(getters使用)'}}</h3>
</div>
</template>
|
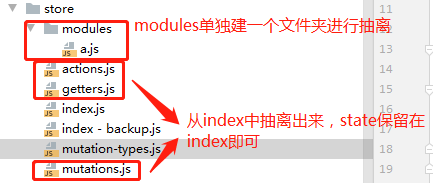
五、Vuex的目录结构
将Vuex中的参数提取出来,放在单独的文件中,方便管理
六、ES6语法补充:解构
6.1 对象解构
- 将一个对象里面的变量提取出来,作为一个新的变量
1
2
3
4
5
6
7
8
9
10
11
12
13
14
15
16
|
const obj = {
name: "莱特雷",
age: 18,
sex: "男"
}
const {name, age, sex} = obj;
|
6.2 数组解构
- 将数组中的元素提取出来,作为一个单独的新变量
1
2
3
4
5
6
7
8
9
10
11
12
|
const names = ["莱特雷", "C酱", "咕料"];
const [name1, name2, name3] = names;
|