关于RabbitMQ中延迟队列的介绍和实现
1 延迟队列
1.1 概念
- 延迟队列中最主要的特征体现在其延迟性上,希望队列中的元素达到指定时间后或之前进行取出和处理
- 通俗来说,延迟队列为存放需要在指定时间被处理元素的队列
1.2 使用场景
- 订单在十分钟之内未支付则自动取消
- 新创建的店铺,如果在十天之内未上传过商品,则自动发送消息提醒
- 用户注册成功后,如果三天内没有登陆,则进行短信提醒
- 用户发起退款,如果三天内没有得到处理,则通知相关运营人员
- 预定会议后,需要在预定时间前十分钟通知人员,参加会议
1.3 关系图
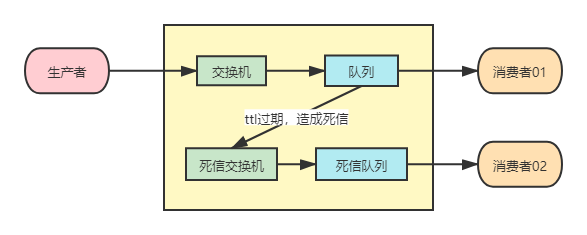
- 可以看出,延迟队列的本质就是死信队列中ttl过期,延迟的时间就是ttl的时间,从而达到延迟的效果
- 所以创建有两种方法:1队列设置ttl过期时间;2生产者发送消息设置消息的ttl过期时间
2 队列设置ttl
2.1 代码架构
2.2 依赖引入
1 | <!--web启动器--> |
2.3 关系配置类
1 | /** |
2.4 生产者
1 | /** |
2.5 消费者
1 | /** |
2.6 测试
- 浏览器输入地址
http://localhost:8080/ttl/sendMessage?message=HelloWorld
3 发消息设置ttl
3.1 代码架构
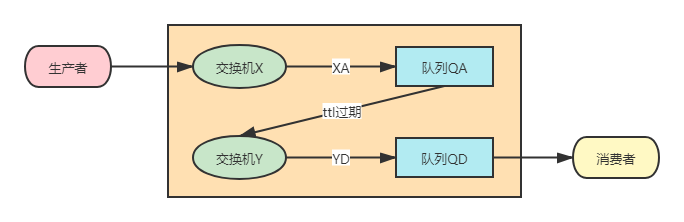
- 跟前面一致,创建多一个队列B出来,此队列B不设置ttl时间,有生产者发送消息时,设置消息的ttl时间
3.2 代码
- (1)配置类: 多创建一个队列B,并与交换机绑定
1
2
3
4
5
6
7
8
9
10
11
12
13
14
15
16
17
18
19
20
21
22
23
24
25
26
27
28
29
30
31
32
33
34
35
36
37
38/**
* 延迟队列配置文件
* @author letere
* @create 2021-08-08 14:12
*/
public class DelayQueueConfig {
// ......
/**
* 构建普通队列B
* @return Queue
*/
public Queue bQueue() {
return QueueBuilder
.durable("QB")
.deadLetterExchange("Y")
.deadLetterRoutingKey("YD")
.build();
}
/**
* 绑定x交换机和b队列
* @param xExchange x普通交换机
* @param bQueue b普通队列
* @return Binding
*/
public Binding bQueueToXExchange( DirectExchange xExchange,
Queue bQueue) {
return BindingBuilder
.bind(bQueue)
.to(xExchange)
.with("XB");
}
}
- (2)生产者: 新增发送消息接口
1
2
3
4
5
6
7
8
9
10
11
12
13
14
15
16
17
18
19
20
21
22
23
24
25
26
27
28/**
* 生产者接口类
* @author letere
* @create 2021-08-08 14:53
*/
public class ProducerController {
// ......
public String sendMessage2(String message, int time) {
log.info("时间:{},接收消息:{},ttl时间:{}秒", new Date(), message, time);
rabbitTemplate.convertAndSend(
"X",
"XB",
message,
msg -> {
// 设置ttl时间
msg.getMessageProperties().setExpiration(String.valueOf(time * 1000));
return msg;
}
);
return "消息发送成功!";
}
}
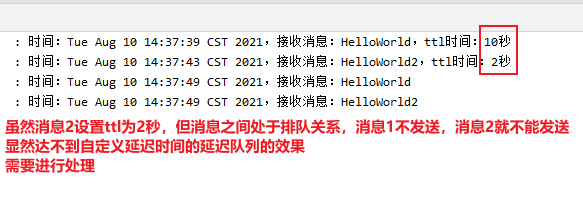
- (3)测试
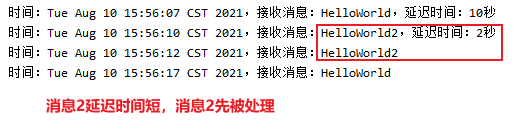
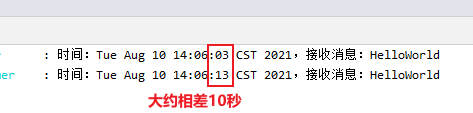
- 单纯只发一条消息,不会出现问题,当连续发送ttl时间不同的消息,则会出现问题 (消息在排队)
- 实现自定义ttl的延迟队列的实现方法在下一节,此节不能解决
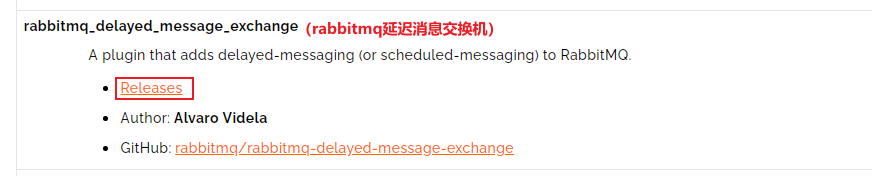
4 插件实现延迟
4.1 插件安装
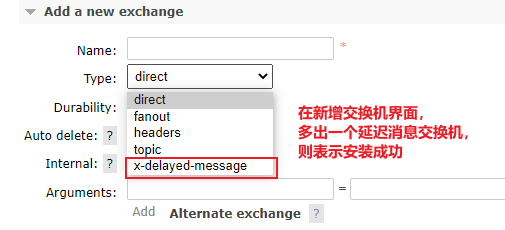
- (2)开启插件
- 移动插件到:
/usr/lib/rabbitmq/lib/rabbitmq_server-3.9.1/plugins - 控制台输入指令:
rabbitmq-plugins enable rabbitmq_delayed_message_exchange - 重启rabbitmq:
systemctl restart rabbitmq-server
4.2 代码架构

- 延迟的实现,不再靠队列ttl死信实现,可以通过交换机自己进行延迟
4.3 代码
- (1)配置类
1
2
3
4
5
6
7
8
9
10
11
12
13
14
15
16
17
18
19
20
21
22
23
24
25
26
27
28
29
30
31
32
33
34
35
36
37
38
39
40
41
42
43
44
45
46
47
48
49
50
51
52
53
54
55
56
57
58
59
60
61
62/**
* 延迟队列配置文件
* @author letere
* @create 2021-08-08 14:12
*/
public class DelayQueueConfig {
// ......
/**
* 构建延迟交换机Z
* @return CustomExchange
*/
public CustomExchange zExchange() {
Map<String, Object> arguments = new HashMap<>();
arguments.put("x-delayed-type", "direct"); // 设置延迟交换机本质类型为direct类型
/*
自定义交换机
参数1:交换机名
参数2:交互机类型
参数3:是否持久化
参数4:是否自动删除
参数5:其他参数
*/
return new CustomExchange(
"Z",
"x-delayed-message",
false,
false,
arguments);
}
/**
* 构建普通队列C
* @return Queue
*/
public Queue cQueue() {
return QueueBuilder
.nonDurable("QC")
.build();
}
/**
* 绑定z交换机和c队列
* @param zExchange z延迟交换机
* @param cQueue c普通队列
* @return Binding
*/
public Binding cQueueToZExchange( CustomExchange zExchange,
Queue cQueue) {
return BindingBuilder
.bind(cQueue)
.to(zExchange)
.with("ZC")
.noargs();
}
}
- (2)生产者
1
2
3
4
5
6
7
8
9
10
11
12
13
14
15
16
17
18
19
20
21
22
23
24
25
26
27
28
/**
* 生产者接口类
* @author letere
* @create 2021-08-08 14:53
*/
public class ProducerController {
// ......
public String sendMessage3(String message, int time) {
log.info("时间:{},接收消息:{},延迟时间:{}秒", new Date(), message, time);
rabbitTemplate.convertAndSend(
"Z",
"ZC",
message,
msg -> {
// 设置延迟时间
msg.getMessageProperties().setDelay(time * 1000);
return msg;
}
);
return "消息发送成功!";
}
}
- (3)消费者
1
2
3
4
5
6
7
8
9
10
11
12
13
14
15
16
17
18
19
20
/**
* 消费者 - 监听器
* @author letere
* @create 2021-08-08 15:09
*/
public class Consumer {
// ......
/**
* 监听队列C,并接收消息
* @param message 消息
*/
public void receiveC(Message message) {
log.info("时间:{},接收消息:{}", new Date(), new String(message.getBody()));
}
}
- (4)测试
- 和之前一样,分别发送两个延迟时间不同的请求,查看消息是否处于排队状态