SpringBoot整合ShardingSphere,来实现分库分表功能
前言:
1 数据准备
1
2
3
4
5
6
|
CREATE TABLE `t_user`  (
  `user_id` bigint NOT NULL COMMENT '用户id',
  `username` varchar(50) NULL COMMENT '用户名',
  `sex` tinyint(1) NULL COMMENT '性别',
  PRIMARY KEY (`user_id`)
);
|
 1
 2
 3
 4
 5
 6
 7
 8
 9
10
|
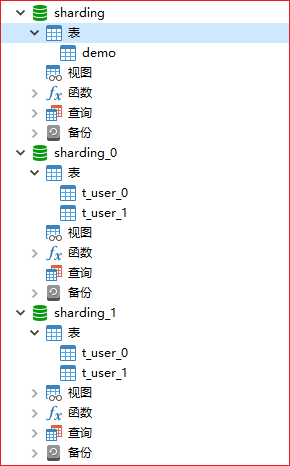
- sharding
  - 任意表

- sharding_0
  - t_user_0
  - t_user_1

- sharding_1
  - t_user_0
  - t_user_1
|
- (3)按照上面的sql,以及数据库表结构,创建好数据库和表
2 ShardingSphere-JDBC
2.1 基本引入
1
2
3
4
5
6
|
<!-- https://mvnrepository.com/artifact/org.apache.shardingsphere/shardingsphere-jdbc -->
<dependency>
    <groupId>org.apache.shardingsphere</groupId>
    <artifactId>shardingsphere-jdbc</artifactId>
    <version>5.5.2</version>
</dependency>
|
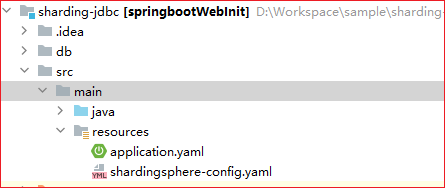
- (2)创建shardingsphere配置文件shardingsphere-config.yaml
 1
 2
 3
 4
 5
 6
 7
 8
 9
10
11
12
13
14
15
16
17
18
19
20
21
22
23
24
25
26
27
28
29
30
31
32
33
34
35
36
37
38
39
40
41
42
43
44
45
46
47
48
49
50
51
52
53
54
55
56
57
58
59
60
61
62
63
|
# 数据源配置
dataSources:
  default_ds:
    dataSourceClassName: com.zaxxer.hikari.HikariDataSource
    driverClassName: com.mysql.cj.jdbc.Driver
    jdbcUrl: jdbc:mysql://127.0.0.1:3306/sharding?serverTimezone=GMT%2B8
    username: letere
    password: 123456
  ds_0:
    dataSourceClassName: com.zaxxer.hikari.HikariDataSource
    driverClassName: com.mysql.cj.jdbc.Driver
    jdbcUrl: jdbc:mysql://127.0.0.1:3306/sharding_0?serverTimezone=GMT%2B8
    username: letere
    password: 123456
  ds_1:
    dataSourceClassName: com.zaxxer.hikari.HikariDataSource
    driverClassName: com.mysql.cj.jdbc.Driver
    jdbcUrl: jdbc:mysql://127.0.0.1:3306/sharding_1?serverTimezone=GMT%2B8
    username: letere
    password: 123456

# 规则配置
rules:
  # 单表配置(不分库分表的表)
  - !SINGLE
    tables:
      - "default_ds.*"
  # 广播表配置(分库分表的表)
  - !BROADCAST
    tables:
      - "ds_0.t_user"
      - "ds_1.t_user"
  - !SHARDING
    # 表分片配置
    tables:
      t_user:
        actualDataNodes: ds_${0..1}.t_user_${0..1}
        # 库分片策略
        databaseStrategy:
          standard:
            shardingColumn: user_id
            shardingAlgorithmName: user_database_inline
        # 表分片策略
        tableStrategy:
          standard:
            shardingColumn: sex
            shardingAlgorithmName: user_table_inline
    bindingTables:
      - t_user
    # 分片算法定义
    shardingAlgorithms:
      user_database_inline:
        type: INLINE
        props:
          algorithm-expression: ds_${user_id % 2}
      user_table_inline:
        type: INLINE
        props:
          algorithm-expression: t_user_${sex % 2}

# sql打印调试
props:
  sql-show: true
|
- (3)application.yaml引入shardingsphere配置文件
1
2
3
4
|
spring:
  datasource:
    driver-class-name: org.apache.shardingsphere.driver.ShardingSphereDriver
    url: jdbc:shardingsphere:classpath:shardingsphere-config.yaml
|
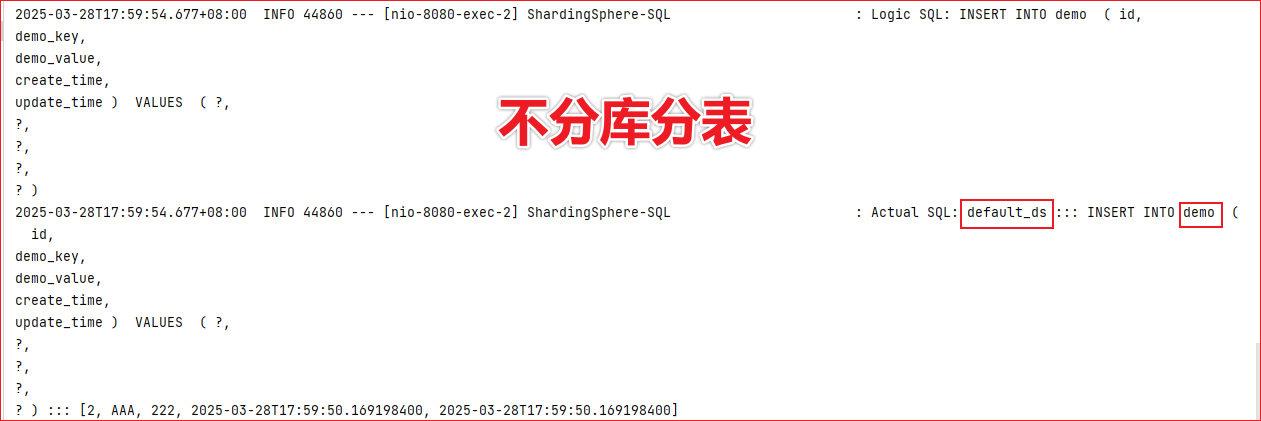
- (4)以上就成功引入实现了分库分表,对
t_user进行新增操作,会触发分库分表策略,对于其他不分库分表的表就,直接在default_ds进行数据操作

2.2 自定义分片算法类
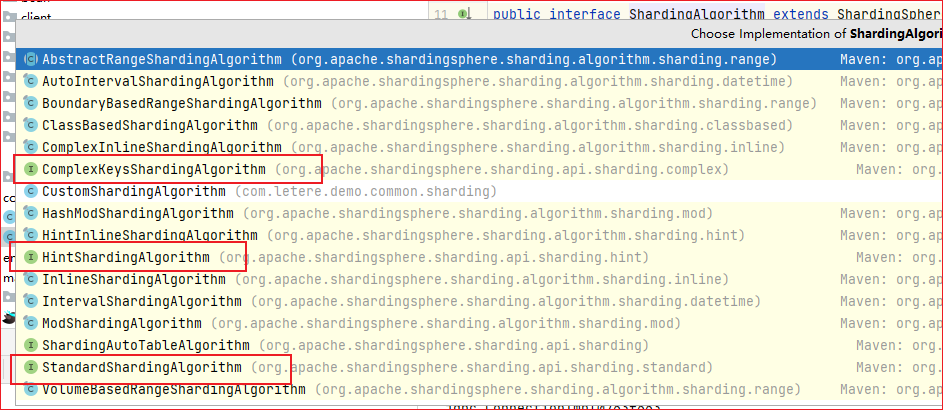
- (1)实现
ShardingAlgorithm的子接口,实现分片算法,下边以StandardShardingAlgorithm举例
- StandardShardingAlgorithm
- ComplexKeysShardingAlgorithm
- HintShardingAlgorithm
- (2)创建自定义类,实现里面的方法
- collection:分片表名集合
- preciseShardingValue:分片字段值
- rangeShardingValue:分片字段范围值
 1
 2
 3
 4
 5
 6
 7
 8
 9
10
11
12
13
14
15
16
|
public class CustomStandardShardingAlgorithm implements StandardShardingAlgorithm<Integer> {
    @Override
    public String doSharding(Collection<String> collection, PreciseShardingValue<Integer> preciseShardingValue) {
        // TODO: 分表业务处理(按自己实际业务修改)
        int tableNo = preciseShardingValue.getValue() % 2;
        // 返回对应的表名(表名_no)
        return preciseShardingValue.getLogicTableName() + "_" + tableNo;
    }

    @Override
    public Collection<String> doSharding(Collection<String> collection, RangeShardingValue<Integer> rangeShardingValue) {
        // TODO: 范围查询分表业务处理,一般用时间来分表的会使用到(按自己实际业务修改)
        // 返回对应表名集合
        return collection;
    }
}
|
- (3)在
shardingsphere-config.yaml中,配置自定义分片算法类
 1
 2
 3
 4
 5
 6
 7
 8
 9
10
11
12
13
14
15
16
17
18
|
rules:
  - !SHARDING
    # 表分片配置
    tables:
      t_user:
        actualDataNodes: ds_${0..1}.t_user_${0..1}
        # 表分片策略
        tableStrategy:
          standard:
            shardingColumn: sex
            shardingAlgorithmName: user_custom_standard
    # 分片算法定义
    shardingAlgorithms:
      user_custom_standard:
        type: CLASS_BASED
        props:
          strategy: STANDARD
          algorithmClassName: com.xxxx.CustomStandardShardingAlgorithm
|
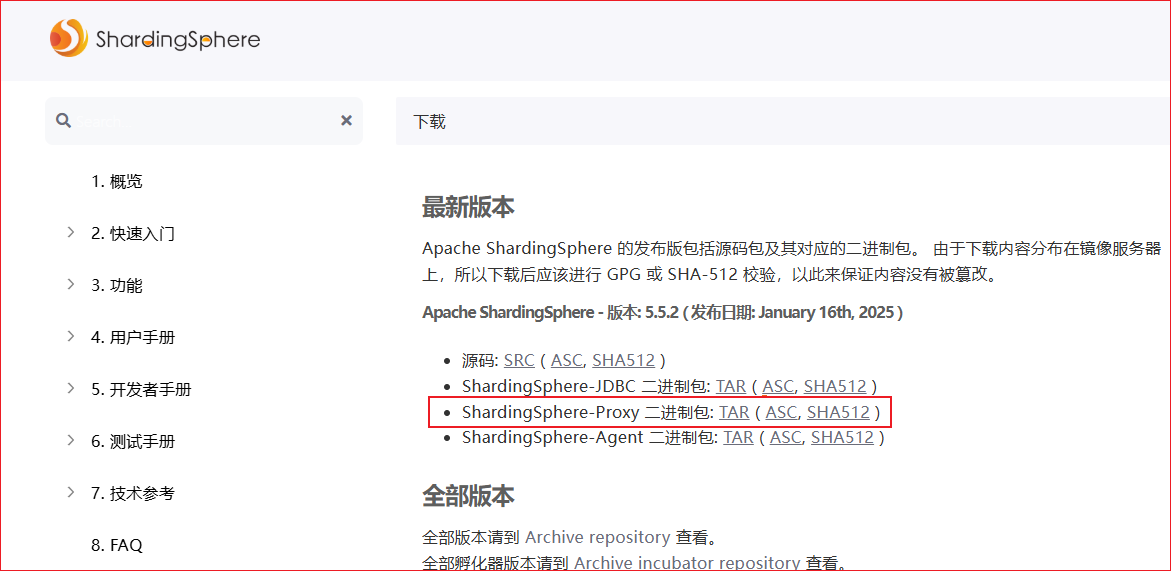
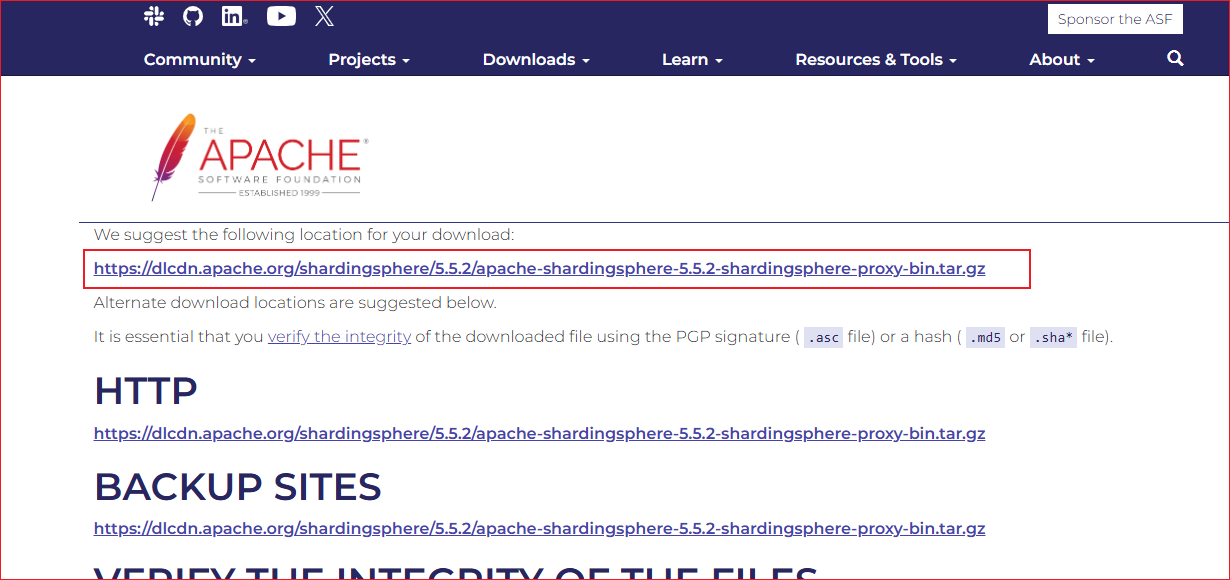
3 ShardingSphere-Proxy
下面ShardingSphere-Proxy的安装使用,是以windows版为主
3.1 基本引入

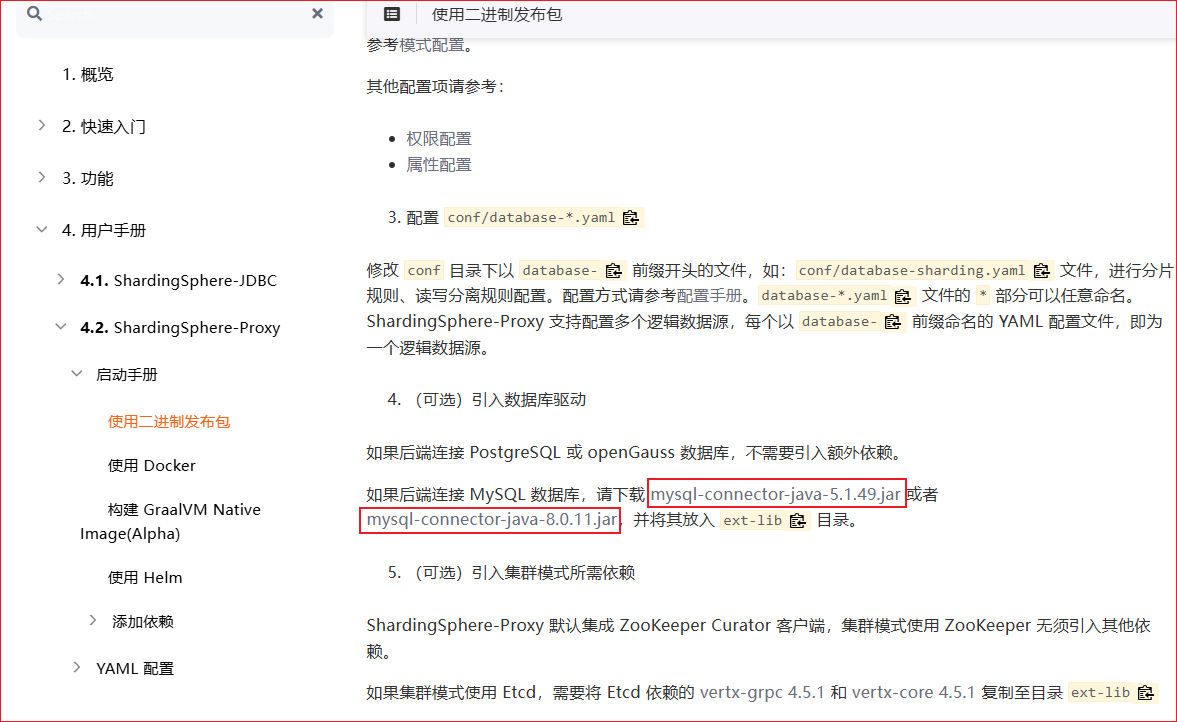
- (4)修改
conf/global.yaml,配置权限和属性
 1
 2
 3
 4
 5
 6
 7
 8
 9
10
11
12
|
# 权限验证
authority:
  users:
    - user: root@%
      password: root
      admin: true
  privilege:
    type: ALL_PERMITTED

props:
  # sql打印
  sql-show: true
|
- (5)修改
conf/database-sharding.yaml,配置数据源和分片规则
 1
 2
 3
 4
 5
 6
 7
 8
 9
10
11
12
13
14
15
16
17
18
19
20
21
22
23
24
25
26
27
28
29
30
31
32
33
34
35
36
37
38
39
40
41
42
43
44
45
46
47
48
49
50
51
52
53
54
55
56
|
# 数据库名
databaseName: sharding_db

# 数据源
dataSources:
  default_ds:
    url: jdbc:mysql://127.0.0.1:3306/sharding?serverTimezone=GMT%2B8
    username: letere
    password: 123456
  ds_0:
    url: jdbc:mysql://127.0.0.1:3306/sharding_0?serverTimezone=GMT%2B8
    username: letere
    password: 123456
  ds_1:
    url: jdbc:mysql://127.0.0.1:3306/sharding_1?serverTimezone=GMT%2B8
    username: letere
    password: 123456

# 规则配置
rules:
  # 单表配置(不分库分表的表)
  - !SINGLE
    tables:
      - "default_ds.*"
  # 广播表配置(分库分表的表)
  - !BROADCAST
    tables:
      - "ds_0.t_user"
      - "ds_1.t_user"
  - !SHARDING
    # 表分片配置
    tables:
      t_user:
        actualDataNodes: ds_${0..1}.t_user_${0..1}
        # 库分片策略
        databaseStrategy:
          standard:
            shardingColumn: user_id
            shardingAlgorithmName: user_database_inline
        # 表分片策略
        tableStrategy:
          standard:
            shardingColumn: sex
            shardingAlgorithmName: user_table_inline
    bindingTables:
      - t_user
    # 分片算法定义
    shardingAlgorithms:
      user_database_inline:
        type: INLINE
        props:
          algorithm-expression: ds_${user_id % 2}
      user_table_inline:
        type: INLINE
        props:
          algorithm-expression: t_user_${sex % 2}
|
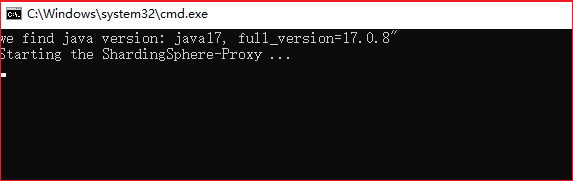
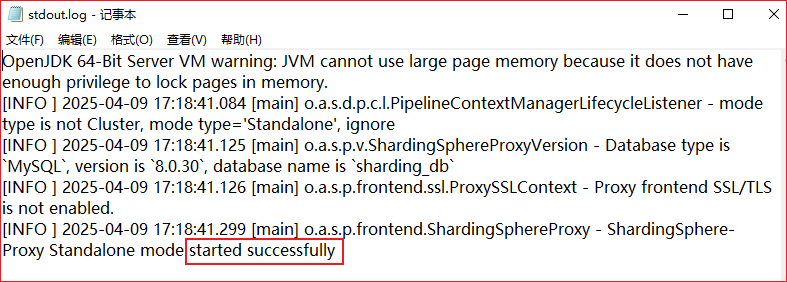
- (6)运行
bin/start.bat,命令行没终止即启动成功,默认端口3307,可以前往logs/stdout.log查看具体启动日志
3.2 连接使用
- (1)可以通过原生mysql命令行,进行连接
- 运行命令
mysql -P3307 -uroot -proot

- (2)用springboot连接的话,就将数据源配置为shardingsphere-proxy服务就好
1
2
3
4
5
|
spring:
  datasource:
    url: 'jdbc:mysql://127.0.0.1:3307/sharding_db?serverTimezone=GMT%2B8'
    username: root
    password: root
|
3.3 自定义分片算法类
3.3.1 自定义算法类打包
1
2
3
4
5
6
|
my-sharding-algorithm/
├── src/
│   └── main/
│       ├── java/
│       └── resources/
└── pom.xml
|
- (2)创建自定义算法类(具体看shardingsphere-jdbc),并放入上面的maven项目中
1
2
3
4
5
6
7
8
9
|
my-sharding-algorithm/
├── src/
│   └── main/
│       ├── java/
│       │   └── com/
│       │       └── example/
│       │           └── CustomShardingAlgorithm.java
│       └── resources/
└── pom.xml
|
 1
 2
 3
 4
 5
 6
 7
 8
 9
10
11
12
13
14
15
16
17
18
19
20
21
22
23
24
25
|
package com.example;

import org.apache.shardingsphere.sharding.api.sharding.standard.PreciseShardingValue;
import org.apache.shardingsphere.sharding.api.sharding.standard.RangeShardingValue;
import org.apache.shardingsphere.sharding.api.sharding.standard.StandardShardingAlgorithm;

import java.util.Collection;

public class CustomShardingAlgorithm implements StandardShardingAlgorithm<Integer> {

    @Override
    public String doSharding(Collection<String> collection, PreciseShardingValue<Integer> preciseShardingValue) {
        // TODO: 分表业务处理(按自己实际业务修改)
        int tableNo = preciseShardingValue.getValue() % 2;
        // 返回对应的表名(表名_no)
        return preciseShardingValue.getLogicTableName() + "_" + tableNo;
    }

    @Override
    public Collection<String> doSharding(Collection<String> collection, RangeShardingValue<Integer> rangeShardingValue) {
        // TODO: 范围查询分表业务处理,一般用时间来分表的会使用到(按自己实际业务修改)
        // 返回对应表名集合
        return collection;
    }
}
|
- (3)在resources目录下创建
META-INF/services/org.apache.shardingsphere.sharding.spi.ShardingAlgorithm文件,并填写上面自定义算法类的全限定名
- 全限定类名:
com.example.CustomShardingAlgorithm
 1
 2
 3
 4
 5
 6
 7
 8
 9
10
11
12
|
my-sharding-algorithm/
├── src/
│   └── main/
│       ├── java/
│       │   └── com/
│       │       └── example/
│       │           └── CustomShardingAlgorithm.java
│       └── resources/
│           └── META-INF/
│               └── services/
│                   └── org.apache.shardingsphere.sharding.spi.ShardingAlgorithm
└── pom.xml
|
 1
 2
 3
 4
 5
 6
 7
 8
 9
10
11
12
13
14
15
16
17
18
19
20
21
22
23
24
25
26
27
28
29
30
31
32
33
34
35
|
<project>
    <modelVersion>4.0.0</modelVersion>

    <groupId>com.example</groupId>
    <artifactId>my-sharding-algorithm</artifactId>
    <version>1.0.0</version>

    <dependencies>
        <!-- ShardingSphere依赖 -->
        <dependency>
            <groupId>org.apache.shardingsphere</groupId>
            <artifactId>shardingsphere-jdbc</artifactId>
            <version>5.5.2</version>
        </dependency>
    </dependencies>

    <build>
        <plugins>
            <plugin>
                <groupId>org.apache.maven.plugins</groupId>
                <artifactId>maven-compiler-plugin</artifactId>
                <configuration>
                    <!-- java版本,看情况修改 -->
                    <source>17</source>
                    <target>17</target>
                    <encoding>utf8</encoding>
                </configuration>
            </plugin>
            <plugin>
                <groupId>org.apache.maven.plugins</groupId>
                <artifactId>maven-assembly-plugin</artifactId>
            </plugin>
        </plugins>
    </build>
</project>
|
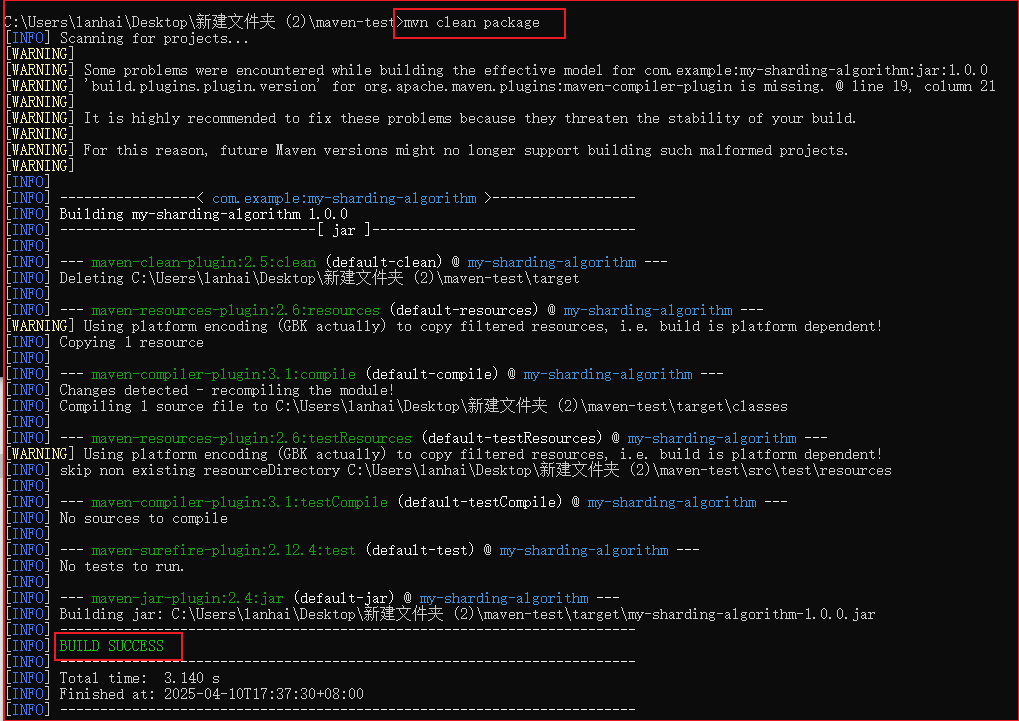
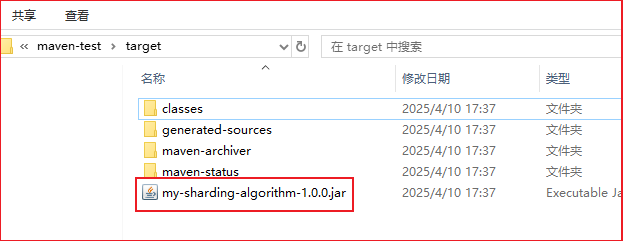
- (5)执行
mvn clean package命令,用maven进行打包,生成的jar包在target文件夹下
3.3.2 proxy配置自定义分片算法类
 1
 2
 3
 4
 5
 6
 7
 8
 9
10
11
12
13
14
15
16
17
|
# 规则配置
rules:
  - !SHARDING
    # 表分片配置
    tables:
      t_user:
        tableStrategy:
          standard:
            shardingColumn: sex
            shardingAlgorithmName: custom_inline
    # 分片算法定义
    shardingAlgorithms:
      custom_inline:
        type: CLASS_BASED
        props:
          strategy: STANDARD
          algorithmClassName: com.example.CustomShardingAlgorithm
|
- (3)重启shardingsphere-proxy服务,即可使用自定义算法类
